Category: Uncategorized

  • S’mores Stout

    S’mores Stout

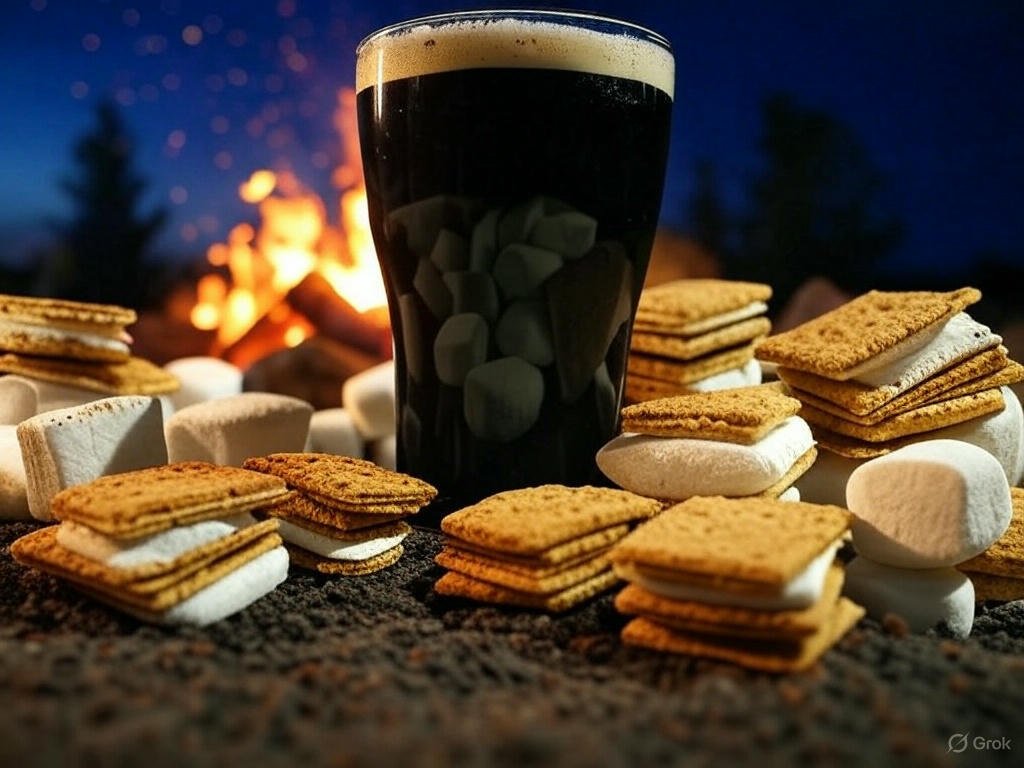
    The Allure of Campfire Stout

    Imagine the warmth of a crackling campfire, the glow casting shadows on the surrounding trees as night falls. The aroma of burnt wood mingles with the sweet scent of roasting marshmallows and the crumbly texture of graham crackers, creating an idyllic scene of camaraderie and comfort. This is the enchanting essence of Campfire Stout, a brew that aims to encapsulate that cozy feeling in every sip. This unique stout is not just a beverage; it is an experience, inviting you to indulge in its rich, smoky, and chocolatey flavors that evoke fond memories of nights spent outdoors.

    At its core, Campfire Stout boasts a complex flavor profile that balances rich malts with subtle hints of smoke, imparting a depth that is both intriguing and satisfying. The chocolate notes are reminiscent of decadent desserts, beckoning with each sip. As you savor this stout, you will taste the familiar sweetness of gooey marshmallows, a nostalgic nod to childhood camping trips. The graham cracker component adds a delightful crunchiness, further enhancing the overall experience. Together, these flavors create a harmonious blend that transports drinkers straight to those cherished campfire gatherings.

    The beauty of brewing your own Campfire Stout lies not only in reaping the rewards of a lovingly crafted beer but also in the opportunity to reminisce about the simple joys of life. With each batch, you invite friends and family to share in the experience, fostering connections while savoring this remarkable stout. The perfect combination of nostalgia and flavor comes alive in this brew, ensuring that it will quickly become a staple in your homebrewing repertoire. Embrace the art of brewing and let the allure of Campfire Stout inspire your next fermentation adventure.

    Ingredients: The Components of Your Campfire Dream

    Creating a Campfire Stout requires a careful selection of ingredients, each contributing uniquely to the overall flavor profile. One of the primary components is 6 lbs of dark dried malt extract (DME). This ingredient serves as the backbone of the stout, imparting a profound depth and robust character that defines the base of the beer. Dark DME is instrumental in providing the stout’s rich and malty flavor, which is essential for any quality brewing experience.

    Next, we have 8 oz of chocolate malt, a key player in achieving the distinct chocolatey notes that characterize the Campfire Stout. This specialty grain introduces an elegant layer of sweetness with roasted notes, which pairs harmoniously with the malt extract. The chocolate malt not only enhances the color of the stout, giving it that enticing dark hue but also contributes to the silky mouthfeel that many enthusiasts crave.

    The intriguing addition of 4 oz of graham cracker crumbs brings a nostalgic flavor reminiscent of campfire s’mores to the brew. This ingredient subtly infuses a mildly sweet and crunchy profile, complementing the chocolate malt perfectly. Additionally, the 4 oz of marshmallow fluff provides a unique touch, lending a creamy sweetness during the secondary fermentation. This fluff contributes to the soft, smooth finish of the stout, evoking memories of warm summer nights around the campfire.

    To round off the ingredients, we utilize 1 oz of Fuggle hops, which perform the essential function of balancing the sweetness derived from the malts and other adjuncts. The earthy and herbal qualities of Fuggle offer a gentle bitterness, curbing the potential for the stout to become overly sweet. Lastly, S-04 yeast is an excellent choice for fermentation, known for its ability to produce a clean finish while enhancing the overall complexity of flavors. These components combined ensure your Campfire Stout is both complex and utterly delightful, setting the stage for a memorable brewing experience.

    Brewing Process: Crafting Your Smoky Stout

    The process of brewing Campfire Stout begins with assembling the necessary ingredients and equipment. It is essential to prepare all your materials ahead of time to ensure a smooth brewing experience. Start by heating a sufficient amount of water for the mash, typically around 160°F. Once the water reaches the desired temperature, add the crushed grains to create a mash. The combination of malted barley, roasted barley, and any specialty grains will lend the stout its characteristic flavors.

    After mashing for approximately 60 minutes, it is crucial to proceed with the boiling phase. The grains are then rinsed, and the sweet wort is collected. Bring the wort to a vigorous boil, being careful to monitor for boil-overs. During this 60-minute boil, you will incorporate hops for bitterness and aroma. For a well-balanced flavor, consider adding hops at various stages: early in the boil for bitterness and later for aromatic qualities. The choice of hops used significantly influences the final outcome of the stout, contributing to its distinguished profile.

    Following the boil, it is essential to rapidly cool the wort to around 65°F before transferring it to a sanitized fermentation vessel. Yeast is then pitched, initiating the fermentation process which should last about two weeks. A consistent fermenting temperature is vital for producing a clean, flavorful stout.

    To achieve the desired flavor complexity, five days into fermentation, carefully add graham cracker crumbs and marshmallow fluff. These unique ingredients are critical for imitating the essence of s’mores while enhancing the chocolatey notes of the stout. Maintain a patient approach throughout the brewing journey, as the time spent nurturing your brew directly impacts the final product. Once fermentation is complete, you will have created a bold and cozy Campfire Stout—a perfect reflection of your brewing dedication.

    Sip, Share, and Enjoy Your Campfire Stout!

    As we reach the end of our journey exploring the delightful world of Campfire Stout, we invite you to take the plunge into brewing this unique and flavorful beer. The smoky, chocolatey dream that is Campfire Stout offers an unparalleled experience, combining the essence of a cozy campfire with the sweetness of s’mores. With its rich flavors and inviting aroma, this stout is not just a drink; it’s an experience worth savoring.

    We encourage you to gather your brewing equipment and give this recipe a try. Immerse yourself in the process, and witness how the combination of ingredients transforms into a delectable stout that perfectly encapsulates the spirit of campfire gatherings. Don’t forget to document your brewing adventure! Share your experiences and photos with our community. We would love to hear how your Campfire Stout turns out and if you’ve added any personal twists to the recipe.

    Engage with us by leaving comments on our blog. Your stories and feedback not only enhance our community but also inspire fellow brewers to embark on their own chocolate stout adventures. Remember, each sip brings you closer to the warm, nostalgic feeling of summers spent around a fire, making this stout an excellent choice for both casual drinkers and seasoned enthusiasts alike.

    So gather your friends, pour yourselves a glass, and enjoy the flavors of your very own Campfire Stout. Here’s to the smoky and chocolatey delights that await you in every pint. Cheers to your next homebrew hit and the wonderful experiences that come with sharing it!

  • Whiskey Ginger Ale

    Whiskey Ginger Ale

    a person holding a mug of beer in a park

    Introduction: A Flavor Heist Awaits

    Embarking on the quest to brew your own Ginger Whiskey Amber Ale is akin to planning an exhilarating flavor heist. Picture this: the fiery kick of ginger awakening your senses, combined with the sultry embrace of whiskey, all nestled within the warm, comforting richness of amber malt. This is not just any beer; it’s an adventure that promises to captivate both your palate and imagination.

    Imagine sipping on a glass of this delightful concoction as the sun sets against the horizon, casting a golden hue that is nothing short of a “sunset on steroids.” Each gulp is a heady mix of taste and sensation, striking the perfect balance between spicy and smooth, making it a true standout in the world of homebrewing. With its tantalizing aroma wafting through the air, every moment spent crafting this ale becomes a celebration of creativity and flavor.

    The ginger brings a bold, zesty flair that invigorates the senses, while the whiskey adds a layer of depth—think of it as the smooth-talking legend at a party, luring everyone closer with its charm. Meanwhile, the rich malt base ensures that the drink is as satisfying as it is complex, providing a foundation that allows each ingredient to shine without overpowering the others. This unique flavor profile beckons beer enthusiasts and casual drinkers alike, inviting them to share in an experience that transcends the ordinary.

    Crafting Ginger Whiskey Amber Ale is more than just following a recipe; it’s about unleashing creativity and exploring the wild interplay of flavors that will leave a lasting impression. Whether you are an experienced brewer or a novice looking to embark on a new culinary adventure, this drink is sure to ignite passion and inspire endless exploration in the world of homebrewing.

    Ingredients: The Building Blocks of Flavor

    Creating a truly exceptional Ginger Whiskey Amber Ale requires a careful selection of ingredients that contribute to its unique flavor profile. The foundation of this brew lies in 6 lbs of amber Dry Malt Extract (DME). The amber DME serves as the backbone of the ale, providing a rich caramel sweetness and a satisfying body that defines the character of the beer. This ingredient not only influences the taste but also aids in achieving the desired amber coloring, making it visually appealing.

    To enhance the beer’s complexity, 1 oz of Cascade hops is incorporated as well. Known for its floral and citrus notes, Cascade hops impart a subtle hoppy balance to the ale without overwhelming the other flavors. The inclusion of hops is vital in creating a well-rounded profile that complements the spice from the ginger and the warmth from the whiskey, resulting in a harmonious blend.

    Arguably, the most distinctive feature of this ale is the introduction of 4 oz of grated ginger root. This spice kick is what sets the Ginger Whiskey Amber Ale apart from more conventional brews. The freshly grated ginger adds a lively zing, enhancing both the aroma and the taste. Its spiciness pairs beautifully with the malty sweetness while also offering a refreshing quality that invigorates the palate.

    Finally, during the secondary fermentation, an intriguing twist is introduced with the addition of 4 oz of whiskey. This unique ingredient elevates the flavor complexity, lending a smooth warmth and depth to the ale. The whiskey blends seamlessly with the other components, enriching the overall experience without overpowering the primary flavors of ginger and malt. Together, these ingredients come together to create a well-balanced and delightful brew, ideal for both novice and experienced homebrewers alike.

    Brewing Process: Crafting Your Masterpiece

    Brewing Ginger Whiskey Amber Ale is an art that requires attention to detail and a keen sense of timing. The process begins with the selection of high-quality ingredients. Start by gathering your base malt, specialty malts, hops, ginger, and whiskey. The base malt is essential, as it provides the fundamental flavor and body for your ale. Specialty malts, such as caramel or crystal malts, will add complexity and a rich amber color. Choosing the right hops is also crucial, as they balance the sweetness of the malt and the spiciness from ginger.

    The brewing process traditionally begins with mashing the grains. Combine the crushed malts with hot water, allowing the enzymes to convert starches into fermentable sugars. Maintain the mash temperature between 152°F to 158°F for approximately 60 minutes. Once mashed, sparge the grains to extract all their sugars. The next step is the 60-minute boil; this is crucial for both flavor development and sterilization. Add your hops in stages during the boil: the initial addition provides bitterness, while later additions are for aroma and flavor enhancements.

    Thermal control during fermentation is vital for achieving the desired flavor profile. After the boil, cool the wort rapidly to about 68°F before transferring it to the fermentation vessel. Pitch the yeast and keep the temperature steady; maintaining this temperature prevents off-flavors from developing. Herein lies the key to optimal flavor extraction: the ethanol concentration allows for a perfect fusion of ginger and whiskey with the ale. Timing is everything; introduce freshly grated ginger and a splash of whiskey about five days into the fermentation process. This timing ensures maximum flavor impact without overwhelming the ale.

    After roughly two weeks, check the specific gravity to confirm fermentation has completed. When your Ginger Whiskey Amber Ale is ready, carefully siphon it into bottles, carbonate appropriately, and allow it to condition. The meticulous attention to detail during each step of this process will empower homebrewers to create a unique brew that embodies a spicy, smooth character perfect for any occasion.

    The Final Sip: Taste the Adventure & Join the Community

    The Ginger Whiskey Amber Ale is not merely a beverage; it is a remarkable fusion of flavors that captivates the palate and invites brewers into a world of adventure and creativity. With its unique blend of spicy ginger notes and the warmth of whiskey, this amber ale offers a delightful drinking experience that balances sweetness and tang. The deep amber hue coupled with its foamy head creates a visual treat that beckons enthusiasts to take that first sip, experience the aroma, and indulge in its robust flavors. Each batch brewed unveils a different character, making every sip an exploration of culinary artistry.

    As you embark on this brewing journey, know that you are not alone. The world of homebrewing is filled with passionate individuals eager to share their experiences, tips, and tricks. This community thrives on collaboration and the exchange of ideas. By creating your own Ginger Whiskey Amber Ale, you have the opportunity to not just challenge your brewing skills, but also to contribute to our communal love for flavorful beers. Engage actively by sharing images of your uniquely crafted brews, offering insights into your brewing process, and discussing variations you tried; these contributions will undoubtedly inspire others.

    A call to action goes out to all aspiring brewers: take the plunge and experiment with your own rendition of this spicy amber ale. Whether you prefer a traditional take or want to add your personal twist, your brewing journey can ignite dialogue, collaboration, and newfound friendships. The path of brewing is about experimenting, tasting, and celebrating the diversity of flavors. Join us in this exciting endeavor and become part of a vibrant community where each bottle tells a story, and each gathering is an opportunity to share the love of creativity in beer making.

  • The Accidental Masterpiece – Left Over Grains

    Three years ago, I had to sell all my brewing gear—Grainfather, kegerator, the works—when I moved from South Africa to New Zealand. It broke my heart, but life happens, right? I left behind a garage full of brews, including this wild 7.0% ABV beer I called ‘Left Over Grains,’ brewed from random scraps in my fridge. It turned out to be my best brew ever—pure accident, total chaos, and now I’m dying to recreate it here in NZ. Still nursing a killer hangover from last week’s pints, but brewing’s my cure—let’s dive in.

    Back in my South African garage, I was heavy into all-grain brewing with my Grainfather. One day, I stared at a fridge full of leftover grains—Pale Malt, Roasted Barley, you name it. No plan, just a ‘why not?’ vibe. Tossed it all in, added some Simcoe and Goldings hops, and 90 minutes later, I had this amber monster with a frothy head. Mates couldn’t believe it—smooth, 7.0% ABV, and packed with flavor. It’s the beer that kept my kegerator humming, but I never wrote down the exact recipe… until now, thanks to Brewfather saving my bacon! Now, I’m starting fresh with a cheap setup—can I recreate it here?

    Here’s the recipe for “Left Over Grains”:

    • Type: All Grain
    • Equipment: Grainfather (or note “Now using a cheap BIAG setup in NZ”)
    • Grains: Leftover varieties (Pale Malt, Caramel Hell, etc.)
    • Hops: Simcoe and Goldings & Northern Brewer
    • ABV: 7.0% (More less) 
    • Steps: Standard all-grain brewing process

    With a little luck, I hope to bring this accidental masterpiece back to life!

    The Big Move: South Africa to New Zealand

    Three years ago, my life took a wild turn. I packed my bags and left South Africa for New Zealand. Selling my brewing gear was tough. I had to let go of my Grainfather and kegerator, which felt like losing a part of myself.

    Leaving my home meant saying goodbye to a beer-loving community. I had countless memories brewing in my garage. Each batch was an adventure, filled with laughter and shared pints.

    New Zealand was calling, and I was excited for new experiences. The move brought challenges like adjusting to a different culture. I had to move on and start fresh.

    With a new country came a fresh start in brewing. I found a cheaper setup to keep my passion alive. I was determined to recreate my best beer, “Left Over Grains.”

    My heart was set on blending cultures through brewing. I wanted to combine South African flavors with New Zealand’s ingredients. It felt good to embrace the challenge of beginning again. The adventure of brewing had just begun in my new home.

    The Unplanned Discovery of ‘Left Over Grains’

    It all started on a lazy afternoon in my South African garage. I was deep into brewing, but I found myself staring at a fridge packed with leftover grains.

    I had Pale Malt, Caramel Hell, and some grains like Munich Malt. With no plan in mind, I thought, “Why not?” I tossed everything together.

    The recipe was simple. I added Simcoe , Nortern Brewer and Goldings hops for that punch. After 90 minutes of boiling, I had an amber masterpiece.

    When I tasted it, I was shocked. This smooth, 7.0% ABV beer had flavor galore. My friends couldn’t believe it was made from scraps.

    It quickly became the brew that kept my kegerator full. I never thought this happy accident would be my best work. But each pour brought back memories of that chaotic brewing day.

    With no exact recipe written down, I knew I had to recreate it. The unplanned discovery of ‘Left Over Grains’ was a game changer for me. It taught me that sometimes, the best things happen by accident.

    Recreating the Masterpiece

    I’ve set up my new brewing space here in New Zealand, and it’s a bit different from my South African garage. I’ve swapped the fancy Grainfather for a budget-friendly BIAB setup. It feels like starting from scratch, but I’m excited.

    To kick things off, I had to gather some ingredients. Here’s what I used:

    Ingredient Quantity
    Pale Malt (South African local malt) 5 kg
    Caramel Hell 384 g
    Munich Malt 272 g
    Melanoidin Light
    200 g
    Biscuit Malt 76 g
    Simcoe Hops (30 min) 20 g
    Northen Brewer (60 min) 14 g 
    Goldings Hops(60 min) 30 g
    Yeast (American Ale) 1 packet

    The process is simple. I heat the water to around 70°C and add the grains for about an hour.

    It’s crucial to keep an eye on the temperature. After mashing, I sparge and collect my wort. Once I’ve got about 20 liters, I boil it for 60 minutes.

    I add hops at different stages: Simcoe at the start for bitterness and Goldings in the final minutes for aroma.

    After cooling, I pitch the yeast and wait. Patience is key! Fermentation should take about a week. Then, I’m ready to bottle and let it condition.

    Let’s hope this version captures the spirit of that accidental masterpiece!

    Crafting the Recipe

    Getting the right mix of ingredients and the brewing process is key to recreating “Left Over Grains.” I’ll break down the essential components and steps, while also considering how my new setup in New Zealand affects things.

    Ingredients and Proportions

    For this batch of “Left Over Grains,” here’s what I recommend using:

    • Base Malt: 3.0 kg Pale Malt/2 Row
    • Base Malt : 2.0 kg Pilsner Malt or Munich Malt
    • Specialty Malt: Add anyhting you want to play with and test out ! Thats the fun part of brewing at home. 
    • Hops:
      • 30 g Simcoe (bittering)
      • 20 g Goldings (flavor)
      • Northern Brewer ( Bittering)
    • Yeast: 1 packet of American Ale yeast
    • Water: Aim for about 20 liters

    These amounts give a balanced flavor and aroma. Feel free to mix in other leftover grains for variety. The key is to maintain that easy-drinking vibe while hitting the 7.0% ABV mark.

    Brewing Process Outline

    1. Mashing: Heat 15 liters of water to 67°C and add the grains. Hold this temperature for 60 minutes to extract sugars.
    2. Sparging: Rinse grains with an additional 5 liters of water at 75°C to collect the wort.
    3. Boiling: Bring the wort to a boil. Add Simcoe hops at the start for bitterness, and Goldings hops with 15 minutes left for aroma.
    4. Cooling: Rapidly cool the wort using an immersion chiller.
    5. Fermentation: Transfer to a fermenter, pitch the yeast, and let it ferment for about two weeks.

    Make sure to monitor temperatures closely during fermentation to avoid off-flavors.

    Adjustments for New Equipment

    Moving to a cheaper brewing setup means I need to tweak some steps. If I’m using a basic BIAB (Brew In A Bag) method, here’s how I adapt:

    • Mashing: Use a single pot to heat water and mash grains all at once. You can still hit that target temperature.
    • Sparging: Avoid traditional sparging; just lift the grain bag and let it drain.
    • Boiling: Make sure to have a strong enough heat source to maintain a rolling boil.
    • Cooling: If I don’t have a chiller, I can place the pot in an ice bath to lower the temperature quickly.

    Keeping things simple helps with consistency, while still getting a great beer.

    Reflections on the Brew

    Brewing “Left Over Grains” was a fun twist in my journey. I never thought random leftovers could turn into such a standout beer. Each sip took me back to my South African garage days.

    The flavors were a revelation. I used a mix of Pale Malt and Roasted Barley. Tossing in Simcoe and Goldings hops added a nice balance. The result was an amber beer with a frothy head. It was smooth and packed with flavor.

    My friends were surprised. They couldn’t believe it came from leftover bits. They loved the 7.0% ABV, and we shared many laughs over pints. This beer became a staple in my home.

    Now, as I try to recreate it in New Zealand, I feel a mix of excitement and nervousness. Will my cheap setup live up to the legend? The memories of that garage brewing adventure inspire me. I hope to capture that essence again. Each batch is a step closer to reliving those amazing moments.

  • Best Homebrewing Starter Kits for Beginners 2025 Guide

    Brewing great beer at home doesn’t require a professional setup—it starts with the right beginner kit. Whether you’re dipping your toes into craft brewing or looking to upgrade your starter gear, this guide covers everything you need: must-have equipment, brewing steps, and top-rated homebrew kits that make beer-making simple and fun.


    What’s in a Homebrewing Starter Kit?

    A solid homebrewing starter kit includes the basic equipment needed to turn ingredients into drinkable beer:

    • A 5- or 1-gallon fermentation vessel with airlock
    • A brew kettle
    • Bottling bucket with spigot
    • Tubing, bottling wand, and capper
    • Sanitizer and cleaning tools
    • Instructions or a brewing manual

    👉 The Northern Brewer HomeBrewing Starter Set is a reliable all-in-one kit for 5-gallon batches, while the Craft A Brew Oktoberfest Ale Kit is ideal for space-saving 1-gallon brewing.


    How to Brew Beer at Home: Step-by-Step

    1. Clean and Sanitize

    Sanitize every tool that touches your beer—from kettle to bottling wand. This prevents off-flavors and contamination.

    2. Boil Your Wort

    Heat water, then steep specialty grains or dissolve malt extract. Bring to a boil and add hops according to your recipe.

    3. Chill and Ferment

    Cool your wort quickly to about 70°F using an ice bath or wort chiller. Transfer it to your fermenter, pitch the yeast, and seal with an airlock.

    4. Bottle and Condition

    After fermentation (1–2 weeks), siphon the beer into bottles with priming sugar. Cap and store for carbonation.

    🛠 The FastFerment Conical Fermenter streamlines bottling by collecting sediment below the beer line.


    Top Homebrewing Kits (2025 Picks)

    🥇 Best Overall: Northern Brewer HomeBrewing Starter Set

    • Batch size: 5 gallons
    • Includes: Fermenter, bottling bucket, sanitizer, instructions, and more
    • Ideal for: Beginners who want room to grow

    🧡 Best Small Batch: Craft A Brew Oktoberfest Ale Kit

    • Batch size: 1 gallon
    • Includes: Ingredients + reusable gear
    • Ideal for: Apartment dwellers or gift-givers

    🔧 Best Advanced Setup: VEVOR Electric Brewing System

    • Programmable controls, all-in-one brewing
    • Great for: Graduating from extract to all-grain brewing

    Tips for Choosing the Right Kit

    • Start with Extract Kits: Easier to learn and quicker to brew
    • Go Small if Space is Limited: 1-gallon kits are perfect for kitchens
    • Check What’s Included: Make sure airlocks, buckets, and sanitizer are part of the package
    • Think Ahead: Choose a kit that can scale with your skills

    Must-Have Accessories for New Brewers


    Common Beginner Questions

    🧼 Do I need to sanitize everything?

    Yes. Clean gear is the #1 way to make beer that doesn’t taste like regret.

    🍺 How long does it take to make beer?

    Around 3–4 weeks: 1 week for brewing/fermentation, 2–3 weeks for bottle conditioning.

    💸 How much does a starter setup cost?

    Anywhere from $40 (1-gallon kits) to $200+ for full-featured 5-gallon systems.


    Final Thoughts: Start Brewing with Confidence

    Homebrewing doesn’t have to be intimidating. With a solid starter kit, a few gallons of water, and a willingness to experiment, you’ll be bottling better beer in no time. Start small, stay clean, and keep learning.

    📬 Want recipes, gear reviews, and brewing hacks? Join the Foamy Horizons Brewing Community


    Suggested Posts to Read Next


    Image Suggestions

    • Header: A clean kitchen counter with a starter kit and ingredients
    • Process: Wort boiling in a stainless kettle
    • Action: Fermenter with bubbling airlock
    • Product: Hero shots of each recommended kit

    Alt text example: \”A beginner homebrew kit with fermenter, bottle caps, sanitizer, and instructions on a wood countertop\”


  • Yeast’s role in beer flavor, fermentation to final product

    Yeast is a tiny but mighty ingredient that transforms simple grain and water into the complex beverage we call beer. During fermentation, yeast creates both the alcohol content and many distinct flavors in beer by converting sugars into alcohol while producing unique flavor compounds like esters and phenols.

    Yeast cells fermenting in a vat of beer, releasing carbon dioxide bubbles and creating alcohol, while imparting unique flavors to the brew

    Different types of yeast create different taste experiences. Saison yeasts add peppery and citrus notes, while lager yeasts tend to produce cleaner, crisper flavors. The strain of yeast chosen by brewers shapes everything from the amount of alcohol to the fruity or spicy character of the final product.

    Key Takeaways

    • Yeast converts sugar into alcohol while creating distinct flavor compounds
    • Each yeast strain produces unique taste characteristics at specific brewing temperatures
    • The amount and type of yeast used directly affects the beer’s strength and taste profile

    The Basics of Yeast in Brewing

    Yeast plays a vital role in transforming sugary wort into beer through fermentation. These microscopic organisms create alcohol and influence the distinct flavors in every brew.

    Types of Brewing Yeast

    Two main categories of brewing yeast exist: ale yeast and lager yeast.

    Ale yeasts work best at warmer temperatures and typically create fruity, complex flavor profiles. They ferment at the top of the brewing vessel at temperatures between 60-75°F.

    Lager yeasts prefer cooler conditions, usually 35-55°F, and ferment at the bottom of the vessel. They produce cleaner, crisper flavors with fewer byproducts.

    Each strain within these categories brings unique characteristics to the final beer, affecting everything from alcohol content to aroma.

    Yeast’s Role in Fermentation

    During fermentation, yeast consumes sugar and creates alcohol and carbon dioxide. This process transforms the sweet wort into beer.

    Beyond alcohol production, yeast creates flavor compounds called esters and phenols. These compounds give beer distinct tastes and aromas.

    Temperature control during fermentation is crucial. Too hot or cold can stress the yeast, creating unwanted flavors or stopping fermentation completely.

    The amount and health of the yeast directly impact the beer’s final alcohol content. Healthy yeast populations ensure complete fermentation and proper flavor development.

    Flavor Profile Contributions

    Yeast strains contribute distinct flavors to beer through complex biochemical processes during fermentation. These microscopic organisms produce various compounds that create fruity, spicy, and other characteristic flavors in different beer styles.

    Esters and Their Impact on Flavor

    Esters are chemical compounds that give beer fruity and floral notes. Common beer esters create banana, apple, and pear flavors.

    The temperature during fermentation affects ester production. Higher temperatures typically lead to more ester formation.

    Different yeast strains produce varying levels of esters. Belgian ale yeasts create high amounts of fruity esters, while lager yeasts produce fewer esters for a cleaner taste.

    Common Beer Esters:

    • Isoamyl acetate: banana and pear
    • Ethyl acetate: apple and solvent-like
    • Ethyl hexanoate: red apple and anise

    Phenols and Their Influence

    Phenolic compounds create spicy and complex flavors in beer. These molecules contribute clove, pepper, and smoke-like characteristics.

    German wheat beer yeasts produce 4-vinyl guaiacol, giving the signature clove flavor to hefeweizens.

    Belgian yeast strains create phenols that add peppery notes to saisons and abbey ales.

    Other Flavor Compounds Produced by Yeast

    Yeast produces various sulfur compounds during fermentation. When properly controlled, these add complexity to the beer’s flavor profile.

    Diacetyl creates butter or butterscotch flavors. Most brewers aim to reduce diacetyl in finished beer through extended conditioning.

    Organic acids produced by yeast affect beer’s tartness and mouthfeel. Lactic acid adds subtle sourness, while succinic acid contributes to body and complexity.

    Key Flavor Compounds:

    • Diacetyl: butter, butterscotch
    • Acetaldehyde: green apple
    • Fusel alcohols: warming, solvent-like

    Alcohol Production

    Yeast transforms sugars into alcohol and carbon dioxide through fermentation, creating both the alcoholic content and distinct flavors in beer.

    Conversion of Sugars to Alcohol

    Yeast cells consume sugar during fermentation, breaking down glucose molecules into ethanol and CO2. This process typically takes 1-2 weeks depending on the beer style.

    The main sugar sources come from malted grains, especially barley. Different malt types provide varying amounts of fermentable sugars.

    Beer fermentation creates byproducts that affect flavor. Esters add fruity notes like banana or pear. Phenols contribute spicy flavors such as clove or pepper.

    Factors Affecting Alcohol Yield

    Temperature plays a crucial role in fermentation efficiency. Most ale yeasts work best between 60-70°F, while lager yeasts prefer cooler temperatures of 45-55°F.

    The initial sugar content directly impacts the final alcohol percentage. More fermentable sugars lead to higher alcohol content.

    Different yeast strains have varying alcohol tolerances. Some strains can produce up to 14% alcohol, while others stop fermenting at lower levels.

    Oxygen levels at the start of fermentation affect yeast health and performance. Proper aeration helps yeast multiply and ferment effectively.

    Yeast Strain Selection

    The right yeast strain shapes beer’s flavor profile and determines its alcohol content through fermentation. Different strains create distinct characteristics that define various beer styles.

    Criteria for Choosing a Yeast Strain

    Temperature tolerance is a key factor when selecting brewing yeast. Each strain has an optimal temperature range where it performs best.

    Brewers must consider the strain’s alcohol tolerance – some yeasts can handle high alcohol environments while others stop working at lower levels.

    Flocculation rate matters too. This describes how quickly yeast cells clump together and settle out of the beer after fermentation.

    The desired fermentation speed affects strain choice. Fast-fermenting strains complete the process in days, while slower strains may take weeks.

    Influence of Yeast Strains on Beer Characteristics

    Different yeast strains create unique flavor compounds during fermentation. Some produce fruity esters, while others generate spicy phenols.

    The strain impacts the beer’s final alcohol content. Each type of yeast has varying abilities to convert sugars into alcohol.

    Ale yeasts typically produce complex flavor profiles with fruit and spice notes. They work best at warmer temperatures.

    Lager yeasts create cleaner, crisper flavors and work at cooler temperatures. They often leave fewer flavor compounds behind.

    Fermentation Conditions

    Yeast cells actively fermenting in a vat of beer, producing bubbles and releasing aroma, surrounded by ingredients like hops and barley

    The precise control of fermentation conditions directly impacts beer quality, flavor development, and alcohol content. Brewers carefully manage temperature, oxygen levels, and fermentation duration to achieve specific flavor profiles and alcohol percentages.

    Temperature’s Effect on Yeast Activity

    Different yeast strains require specific temperature ranges to produce optimal flavors and alcohol content. Ale yeasts thrive between 60-75°F (15-24°C), while lager yeasts prefer cooler temperatures of 35-55°F (2-13°C).

    Higher temperatures speed up fermentation but can create unwanted flavors like fruity esters or harsh alcohols. Lower temperatures slow down yeast activity but often result in cleaner, crisper flavors.

    Temperature fluctuations during fermentation can stress yeast cells, leading to off-flavors or stuck fermentation. Professional brewers use temperature-controlled tanks to maintain consistent conditions.

    Oxygen Levels and Yeast Growth

    Yeast needs oxygen at the start of fermentation to multiply and create healthy cell walls. The initial growth phase affects the beer’s final taste and alcohol content.

    Too little oxygen can result in:

    • Slow or incomplete fermentation
    • Stressed yeast producing off-flavors
    • Lower alcohol content

    After the initial growth phase, fermentation must continue without oxygen to prevent oxidation and maintain beer quality.

    Fermentation Time and Beer Quality

    The duration of fermentation influences the final beer characteristics. Most ales complete primary fermentation in 3-7 days, while lagers may take 2-3 weeks.

    Rushing fermentation can leave residual sugars and create incomplete flavor profiles. Extended fermentation times allow yeast to clean up unwanted compounds.

    Signs of complete fermentation:

    • Stable gravity readings
    • Clear beer appearance
    • Desired flavor development
    • Proper carbonation levels

    Post-Fermentation Handling

    The proper handling of yeast after fermentation affects beer quality and future brewing success. Careful management prevents off-flavors while enabling cost-effective yeast reuse.

    Yeast Autolysis and Its Effects

    Yeast cells break down after completing fermentation, releasing compounds into the beer. This process, called autolysis, can create unwanted meaty or rubbery flavors.

    Temperature control is vital. Keeping beer below 68°F (20°C) during storage slows autolysis and preserves flavor quality.

    Prompt removal of beer from yeast sediment prevents these off-flavors. The ideal racking time is 5-7 days after fermentation ends for most ales.

    Yeast Washing and Reuse Techniques

    Professional brewers often reuse yeast for multiple fermentations. Proper washing techniques remove trub and dead cells while preserving healthy yeast.

    Steps for effective yeast washing:

    • Collect yeast slurry from primary fermentation
    • Mix with sterile water
    • Let settle for 20 minutes
    • Decant liquid, keeping healthy yeast
    • Store in sanitized containers at 38-40°F

    Most yeast strains can be reused 4-6 times before showing signs of mutation or reduced performance. Regular viability testing ensures consistent fermentation results.

    Interactions With Other Ingredients

    Yeast cells fermenting in a frothy vat, releasing bubbles and creating a distinct aroma

    Yeast works together with other beer ingredients to create unique flavors and aromas during fermentation. The success of fermentation depends heavily on how yeast interacts with hops, malts, and other grain-derived compounds.

    Impact of Hops on Yeast Performance

    Different yeast strains react uniquely to hop compounds. Some strains enhance hoppy flavors, while others may suppress them.

    Hop acids can stress yeast cells during fermentation, sometimes slowing down their activity. This is especially true with heavily hopped beers like IPAs.

    Certain hop varieties release compounds that combine with yeast-produced esters to create new flavor molecules. For example, some American hop varieties work with specific yeast strains to produce tropical fruit notes.

    Interaction With Malts and Grains

    Yeast feeds on the sugars that come from malted grains. Different grain bills produce varying sugar profiles, which affect how well yeast can ferment the wort.

    Some grain varieties provide extra nutrients that help yeast stay healthy during fermentation. These nutrients include zinc, nitrogen, and amino acids.

    Complex sugars from specialty malts may be harder for yeast to break down. This can lead to residual sweetness in the finished beer.

    When malts are kilned at high temperatures, they create compounds that can either help or hinder yeast performance. Dark roasted malts may contain substances that slow fermentation.

    Innovations in Yeast Usage

    Modern brewing science has revolutionized yeast development through advanced biotechnology and selective breeding programs. These innovations create new flavors and improve brewing efficiency.

    Genetic Modification of Yeasts

    Brewing yeasts now benefit from precise genetic modifications that enhance their performance. Scientists can adjust genes to control alcohol tolerance and flavor compound production.

    Labs use CRISPR technology to create yeasts that produce specific taste profiles while maintaining high fermentation efficiency. These modified strains can create beers with unique characteristics previously impossible to achieve.

    Some modified yeasts can ferment at lower temperatures while still producing traditional ale flavors. Others are designed to create fruity esters without adding actual fruit to the brewing process.

    Novel Yeast Strain Development

    Brewers and scientists collaborate to discover and develop new yeast strains from natural sources. These efforts have led to unique flavor profiles that expand brewing possibilities.

    Recent developments include:

    • Hybrid strains combining ale and lager characteristics
    • Cold-tolerant yeasts for more efficient fermentation
    • Strains that produce reduced off-flavors
    • High-alcohol tolerant varieties for strong beers

    Researchers have isolated wild yeasts from traditional brewing regions, creating new strains that maintain historical flavor profiles while offering improved fermentation stability.

    Environmental and Sustainability Considerations

    Yeast cells actively fermenting in a bubbling vat of beer, releasing CO2 and creating alcohol, surrounded by sustainable brewing equipment and natural elements

    The brewing industry focuses on efficient yeast practices to reduce environmental impact and promote sustainability. Green initiatives in yeast handling help breweries save money while protecting the planet.

    Recycling Yeast in the Brewing Process

    Brewing yeast can be reused multiple times before it loses effectiveness. Professional breweries typically reuse yeast for 4-8 fermentation cycles.

    Reusing yeast reduces the need for new yeast production, which cuts down on energy usage and raw materials. This practice saves breweries significant costs on purchasing fresh yeast.

    Proper yeast storage between batches is essential. Temperature-controlled storage tanks help maintain yeast viability and health for future use.

    Reducing Waste Through Yeast Management

    Baker’s yeast alternatives offer sustainable options for beer production. Some breweries now experiment with modified baker’s yeast strains to reduce resource consumption.

    Spent yeast becomes valuable agricultural feed or can be composted. Many farms use expired brewing yeast as a nutrient-rich fertilizer supplement.

    Modern yeast management systems help brewers track cell counts and viability. This precision reduces waste by ensuring optimal yeast pitching rates.

    Smart inventory systems allow breweries to share excess healthy yeast with other local brewers. This collaboration cuts down on waste while building community connections.

    Frequently Asked Questions

    Yeast transforms sugars into alcohol through complex chemical reactions, creating distinct flavors and aromas along the way. The process depends on specific strains, temperatures, and other brewing conditions.

    How does yeast contribute to the fermentation process in beer-making?

    Yeast cells consume the sugars from malted grains and convert them into alcohol and carbon dioxide. This crucial conversion process creates the foundation for beer’s alcohol content.

    The fermentation process typically takes several days to two weeks, depending on the beer style and brewing conditions.

    Can you explain the differences between yeast strains used in brewing?

    Ale yeasts work at warmer temperatures and create fruity, complex flavors. They ferment at the top of the brewing vessel.

    Lager yeasts prefer cooler temperatures and produce cleaner, crisper flavors. They settle at the bottom during fermentation.

    What byproducts does yeast produce during the beer fermentation that influence flavor?

    During fermentation, yeast creates esters that add fruit-like flavors to beer. These compounds can give beer notes of banana, apple, or pear.

    Yeast also produces phenols, which can add spicy or clove-like characteristics to certain beer styles.

    In what ways does yeast affect the alcohol content of beer?

    The efficiency of yeast in converting sugars determines the final alcohol content. .

    Some yeasts can produce higher alcohol levels before becoming inactive, making them ideal for strong beers.

    What are the roles of different yeast types in the brewing of ales versus lagers?

    Ale yeasts work at 60-70°F and complete fermentation in 3-7 days. They create more complex flavor profiles.

    Lager yeasts operate at 35-55°F and take longer to ferment, often 2-3 weeks. They produce fewer flavor compounds.

    How can yeast fermentation conditions affect the outcome of beer taste and alcohol level?

    Temperature control directly impacts yeast behavior and flavor production. Higher temperatures speed up fermentation but can create unwanted flavors.

    Proper oxygen levels at the start of fermentation help yeast multiply and stay healthy throughout the process.

    The amount of available fermentable sugars affects both the final alcohol content and sweetness of the beer.

  • A Step-by-Step Guide to Perfect Beer Hopping

    Making great beer requires careful attention to hop additions during the brewing process. Timing these additions correctly creates the perfect balance of bitterness, flavor, and aroma in your finished brew. The key to mastering hop additions is understanding that early additions create bitterness while late additions enhance flavor and aroma.

    A brewer adds hops to a large stainless steel kettle, steam rising as the hops are poured in. The sunlight streams through the windows, casting long shadows on the polished floor

    Each stage of the brewing process offers unique opportunities for adding hops. Early boil additions contribute to the beer’s fundamental bitterness, while late additions and dry hopping create the complex flavors and aromas that make craft beer special.

    Key Takeaways

    • Different hop addition times produce distinct characteristics in the final beer
    • Early boil hops create bitterness while late additions enhance flavor and aroma
    • The temperature and timing of hop additions directly impact the beer’s taste profile

    The Basics of Beer Brewing

    Beer brewing transforms simple ingredients into a complex beverage through several key steps. The four main ingredients are water, malted barley, hops, and yeast.

    The process starts with malting, where barley grains are soaked in water and allowed to sprout. This creates enzymes needed for brewing.

    Next comes mashing, where the malted grains are mixed with hot water. This releases sugars that will later become alcohol.

    During the boiling stage, hops are added to provide bitterness and aroma. Hops can create floral, citrus, or herbal notes depending on when they’re added to the boil.

    Hop Benefits:

    • Creates bitter flavors
    • Adds unique aromas
    • Acts as a preservative
    • Helps create foam

    After boiling, the liquid is cooled and yeast is added. The yeast converts sugars into alcohol and carbon dioxide through fermentation.

    The fermentation process typically takes 1-2 weeks. During this time, the yeast transforms the sugary liquid into beer.

    Temperature control is crucial throughout brewing. Each step requires specific temperatures for optimal results.

    Understanding Hops and Their Role

    Hops stand as a crucial ingredient in beer making, serving multiple essential functions. Hops contribute bitterness, aroma, and flavor to every brew, making them indispensable in modern brewing.

    The addition of hops during brewing creates a perfect balance with the sweet malt. Different hop varieties offer unique characteristics, ranging from citrusy to piney notes, letting brewers craft distinct flavor profiles.

    Hops help preserve beer by preventing spoilage. Their natural compounds act as preservatives, extending the beer’s shelf life and maintaining its quality.

    Key Benefits of Hops in Beer:

    • Adds bitterness to balance malt sweetness
    • Creates distinct aromas and flavors
    • Acts as a natural preservative
    • Helps maintain beer stability

    Brewers add hops at different stages of the brewing process. Early additions provide bitterness, while late additions enhance aroma. This timing greatly affects the final taste of the beer.

    The amount and type of hops used depend on the beer style being made. IPAs typically use more hops than lagers, creating stronger bitter notes and more intense aromas.

    Preparing the Brew

    A clean workspace, properly treated water, and careful attention to mashing temperatures form the foundation of excellent beer. These initial steps determine the quality and character of the final product.

    Equipment Sanitization

    Proper sanitization prevents unwanted bacteria and wild yeast from contaminating the beer. Every piece of equipment that touches the wort needs thorough cleaning.

    Use food-grade sanitizer on all brewing equipment:

    • Fermenting vessels
    • Stirring spoons and thermometers
    • Transfer hoses and airlocks
    • Measuring equipment

    Rinse equipment with hot water first to remove visible debris. Apply sanitizer according to product instructions and allow proper contact time.

    Keep a spray bottle of sanitizer ready during the brewing process for quick cleaning of tools and equipment.

    Water Quality and Treatment

    Water makes up 90-95% of beer’s composition. Municipal tap water often contains chlorine and minerals that can affect beer flavor.

    Common water treatments:

    • Carbon filtration to remove chlorine
    • Addition of brewing salts for pH adjustment
    • Mineral additions for specific beer styles

    Test water pH before brewing. The ideal range falls between 5.2 and 5.6 for most beer styles.

    Mashing Process

    The mashing process converts grain starches into fermentable sugars. Temperature control is crucial during this stage.

    Target mash temperatures:

    • 148-152°F (64-67°C) for dry, highly fermentable wort
    • 154-158°F (68-70°C) for fuller-bodied beer
    • 162-166°F (72-74°C) for unfermentable sugars

    Maintain consistent temperature throughout the 60-minute mash. Stir gently every 15 minutes to prevent cold spots.

    Test wort with iodine to confirm starch conversion is complete. A color change indicates unconverted starches remain.

    Wort Production

    Converting malted grains into fermentable wort requires precise temperature control and timing. The boiling stage breaks down proteins, sterilizes the liquid, and enables proper hop utilization.

    The Boiling Procedure

    The wort must reach a rolling boil of 212°F (100°C) to achieve proper hop isomerization and bittering. A vigorous boil helps coagulate proteins and creates hot break formation.

    Most recipes call for a 60-minute boil time. During this period, hop additions occur at specific intervals – typically at 60, 30, 15, 10, and 5 minutes before the end of the boil.

    The boiling process eliminates unwanted volatile compounds and reduces the volume of wort to reach the target original gravity.

    Monitoring the Boil

    Brewers must watch for boilovers, especially in the first 5-10 minutes when proteins begin to coagulate. A spray bottle with cold water helps control foam.

    Regular gravity measurements track the concentration of sugars as water evaporates. The typical evaporation rate is 1-1.5 gallons per hour for a 5-gallon batch.

    Temperature consistency is crucial – fluctuations can affect hop utilization and flavor compounds. A thermometer should be used to maintain the proper rolling boil.

    Hop Additions

    Adding hops at specific times during the brewing process creates distinct flavor profiles and characteristics in beer. The timing and technique of hop additions directly impacts bitterness, flavor complexity, and aromatic qualities.

    Bittering Hops Introduction

    Hop additions in the first 45-60 minutes of boiling create the backbone of bitterness in beer. The extended boil time allows alpha acids to isomerize and dissolve into the wort.

    Select hops with high alpha acid content for bittering additions, as they provide more efficient bitterness extraction. Common bittering varieties include Columbus, Magnum, and Warrior.

    The amount of bittering hops needed depends on the target IBU (International Bitterness Units) for the beer style. A pale ale might need 30-40 IBUs while an IPA could require 60+ IBUs.

    Flavor Hops Timing

    Flavor hop additions occur between 20-30 minutes before the end of the boil. This timing preserves more hop oils while still extracting some bitterness.

    These additions contribute complexity through:

    • Floral notes
    • Citrus characteristics
    • Herbal qualities
    • Spicy undertones

    Use moderate alpha acid varieties that offer distinct flavor profiles. Popular choices include Cascade, Centennial, and East Kent Goldings.

    Aroma Hops Technique

    Late hop additions in the final 5-10 minutes of boiling maximize aroma. The short boil time preserves volatile oils responsible for hoppy aromatics.

    Common aroma hop techniques:

    • Flameout additions (0 minutes)
    • Whirlpool hops (sub-180°F)
    • Hop stands (15-30 minutes rest)

    Choose varieties known for their aromatic qualities like Citra, Mosaic, or Amarillo.

    Dry Hopping Method

    Dry hopping involves adding hops during or after fermentation. This cold-side technique creates intense hop aromas without adding bitterness.

    Typical dry hopping schedule:

    • Add hops 3-7 days before packaging
    • Use 1-4 oz per 5 gallons
    • Remove hops after desired intensity

    Keep temperatures below 70°F during dry hopping to prevent grassy flavors. Use pellets or whole leaf hops in a mesh bag for easy removal.

    Fermentation Dynamics

    The transformation of sugars into alcohol requires precise yeast management and temperature control throughout the fermentation process. These factors directly impact beer flavor, aroma, and quality.

    Yeast Inoculation

    Optimal fermentation starts with the correct amount of healthy yeast cells. Brewers calculate pitch rates based on wort gravity and batch size.

    The typical pitch rate ranges from 0.75 to 1.5 million cells per milliliter per degree Plato. Higher gravity beers need more yeast cells.

    Fresh yeast provides the best results. Brewers must check yeast viability before pitching to ensure proper fermentation performance.

    Oxygen levels in the wort must reach 8-10 parts per million before adding yeast. This helps yeast cells multiply and maintain healthy cell walls.

    Fermentation Temperature Control

    Each yeast strain has an ideal temperature range that affects flavor development. Ale yeasts typically ferment between 62-72°F (17-22°C), while lager yeasts prefer 48-55°F (9-13°C).

    Temperature spikes can create unwanted flavors like fusel alcohols or fruity esters. Careful monitoring prevents these off-flavors.

    Modern breweries use glycol-jacketed fermenters to maintain precise temperatures. This equipment allows brewers to adjust temperatures during different fermentation phases.

    The first 72 hours are most critical for temperature control. This period sees the most active fermentation and heat generation from yeast activity.

    Post-Fermentation Practices

    A brewer carefully adds hops to a large stainless steel tank, surrounded by bags of various hop varieties. The air is filled with the earthy, floral aroma of the hops as they are poured into the tank

    The steps taken after fermentation play a vital role in creating the final beer profile. The right conditioning and carbonation methods ensure proper flavor development and the perfect mouthfeel.

    Conditioning the Beer

    Post-fermentation adjustments can enhance beer complexity through careful additions and temperature control.

    Cold conditioning helps clarify the beer and smooths out harsh flavors. The ideal temperature range is 33-38°F (0.5-3.3°C) for 1-2 weeks.

    Dry hopping after fermentation can significantly increase hop compounds like Geraniol, creating more intense aromatic profiles.

    The beer should be monitored for signs of contamination during conditioning. Good manufacturing practices and sanitation are essential at this stage.

    Carbonation Methods

    Force carbonation offers precise control and quick results. The recommended pressure range is 12-15 PSI at serving temperature.

    Natural carbonation through bottle conditioning requires adding priming sugar at a rate of 4-5 oz per 5 gallons.

    Temperature impacts carbonation absorption. Lower temperatures allow more CO2 to dissolve into the beer.

    Different beer styles need different carbonation levels:

    • Light lagers: 2.2-2.7 volumes CO2
    • Ales: 2.0-2.4 volumes CO2
    • Belgian styles: 2.8-3.4 volumes CO2

    Packaging and Storage

    After brewing and fermentation, proper packaging and storage helps maintain beer quality and hop flavors. Beer needs protection from light, heat, and oxygen.

    Temperature control is vital. Store beer between 35-45°F (2-7°C) to preserve hop aromas and prevent flavor changes.

    Brown glass bottles offer the best protection from light damage. Green or clear bottles don’t block harmful UV rays that can make beer taste “skunky.”

    Proper containers for storage:

    • Brown glass bottles
    • Aluminum cans
    • Stainless steel kegs
    • Dark glass growlers

    Keep bottles and cans upright, not on their sides. This reduces the beer’s contact with air in the headspace.

    The brewing process creates carbon dioxide that helps preserve beer. Don’t shake or disturb containers, as this releases the protective CO2.

    Label all containers with:

    • Beer name
    • Brewing date
    • Best-by date
    • Storage instructions

    Check seals and caps regularly for damage. Replace any questionable closures to prevent oxidation.

    Most beers stay fresh for 4-6 months when stored correctly. Heavily hopped beers like IPAs should be consumed within 3 months for the best flavor.

    Tasting and Evaluation

    A brewer carefully adds hops to a boiling kettle, steam rising as the aroma fills the air. The hops are measured and poured in at precise intervals, creating a visual and olfactory symphony

    Keeping detailed notes during the tasting process helps brewers improve future batches. Write down observations about appearance, aroma, flavor, and mouthfeel immediately after tasting.

    Pay attention to the balance between hop bitterness and malt sweetness. Note whether the hop timing decisions achieved the desired flavor and aroma characteristics in the finished beer.

    Key areas to evaluate:

    • Clarity and color
    • Head retention and lacing
    • Hop aroma intensity
    • Bitterness level
    • Malt character
    • Off-flavors (if any)

    Compare the results to the original recipe goals. Note if the hop additions created the expected bitterness and flavor profile. This information guides adjustments for the next brew.

    Record the beer’s development over time. Some hop characteristics may change during conditioning and storage. Regular tasting helps track these changes.

    Share samples with other brewers to get additional feedback. Different palates can detect subtle flavors that might be missed by a single taster.

    Frequently Asked Questions

    Hop timing, usage methods, and varieties create distinct flavor profiles in beer. The interaction between hops and other brewing elements determines bitterness, aroma, and preservation qualities.

    What is the impact of different hop addition times on beer flavor and bitterness?

    Early hop additions during the boil create more bitterness, while adding hops near the end enhances aroma.

    The timing of hop additions lets brewers control the balance between bitter and aromatic qualities. A 60-minute boil produces strong bitterness, while a 5-minute addition contributes mainly to aroma.

    How does dry hopping enhance the aroma and taste of beer without increasing bitterness?

    Dry hopping involves adding hops after fermentation when the wort has cooled. This method extracts aromatic oils without isomerizing alpha acids, which create bitterness.

    The process adds fresh hop character like citrus, pine, or floral notes without making the beer more bitter.

    What are bittering hops, and how do they differ from other types of hops used in brewing?

    Bittering hops contain high alpha acid levels and are added at the start of the boil. These hops undergo isomerization during the long boil to create beer’s characteristic bitterness.

    Aroma hops have lower alpha acids but more essential oils for fragrance and flavor complexity.

    Can you explain the antiseptic properties of hops and how they benefit the beer brewing process?

    Hops provide natural preservative qualities through their tannins. These compounds help protect beer from spoilage.

    The antimicrobial properties of hops inhibit harmful bacteria growth while allowing beneficial yeast to thrive during fermentation.

    What characteristics distinguish noble hops and their influence on the flavor profile of a beer?

    Noble hops feature low alpha acids and subtle, refined aromas. These traditional European varieties impart elegant spicy and floral characteristics.

    They create balanced bitterness and sophisticated flavor profiles ideal for classic lager styles.

    At what stage in the brewing process are hops first introduced, and what effect does this have on the final product?

    The first hop addition typically occurs at the start of the boil. This early addition allows maximum isomerization of alpha acids.

    The extended boil time creates a clean, smooth bitterness that forms the backbone of the beer’s flavor profile.

  • Brewing IPA, Hop Selection, IPA Bitterness Levels: Mastering Hop Profiles for Perfect Balance

    Crafting the perfect IPA requires careful attention to hop selection and bitterness levels. The right combination of hop varieties and timing during the brewing process determines whether your IPA will have a harsh, overwhelming bitterness or a smooth, balanced character with pleasant hop aromas.

    A brewer carefully selects hops for an IPA, measuring bitterness levels in a cozy, rustic brewery

    Different hop varieties provide unique bitterness profiles, with some creating sharp, intense flavors while others offer milder, more nuanced characteristics. Modern IPAs often focus on hop aroma and fruitiness rather than extreme bitterness, reflecting evolving consumer preferences.

    The pH level of brewing water affects hop extraction and plays a vital role in achieving desired bitterness levels. When brewers control these factors properly, they can create IPAs that showcase the best qualities of their chosen hop varieties.

    Key Takeaways

    • Hop selection and timing directly impact an IPA’s bitterness and flavor profile
    • Water chemistry and pH levels affect hop extraction during brewing
    • Modern IPA styles emphasize balanced bitterness with enhanced hop aromatics

    History of India Pale Ale

    India Pale Ale emerged as a solution to preserve beer during long sea voyages from Britain to India in the 1700s. The signature high hop content and stronger alcohol levels became defining features that shaped modern craft brewing.

    Origins and Evolution

    George Hodgson of London’s Bow Brewery created the first IPA in the late 18th century. He increased the hops and alcohol content to help the beer survive the long journey to India.

    The British East India Company played a key role in establishing IPA trade routes. Ships transported these sturdy ales across oceans, using up to 10 pounds of hops per barrel to maintain freshness.

    Early IPAs were notably different from modern versions. They featured pale malts and English hop varieties, creating a more balanced profile than today’s hop-forward styles.

    Global Spread and Popularization

    IPA became the prototype for craft beer in the modern era. Its revival started in the 1970s when American craft brewers embraced the style.

    American brewers put their own spin on IPAs by using local hop varieties. These new interpretations featured bold citrus and pine flavors.

    The craft beer movement helped create numerous IPA sub-styles:

    • West Coast IPA
    • New England IPA
    • Double/Imperial IPA
    • Session IPA

    Today, most breweries offer at least one IPA in their lineup, making it one of the most popular craft beer styles worldwide.

    The Brewing Process

    Making a great IPA requires careful attention to temperatures, timing, and technique during each step from grain to glass. The process combines traditional brewing methods with specialized techniques that bring out the signature hoppy characteristics.

    Mashing and Fermentation

    Mashing combines malted grains with hot water at 150-155°F to convert starches into fermentable sugars. This creates the sweet liquid called wort that forms the beer’s base.

    The wort is then boiled for 60-90 minutes. This is when brewers add the first round of hops. The longer these hops boil, the more bitterness they contribute.

    Fermentation begins when yeast is added to the cooled wort. The yeast consumes sugars and produces alcohol over 1-2 weeks at 65-70°F. Many brewers add more hops during or after fermentation for extra aroma.

    Clarification and Packaging

    After fermentation completes, the beer needs time to settle. Most brewers cool the IPA to near freezing temperatures for 2-3 days to help proteins and hop particles drop out of suspension.

    Some hop varieties can make IPAs taste too bitter, so careful filtering helps achieve the right balance. Many craft brewers prefer minimal filtering to preserve hop oils and flavors.

    The finished IPA moves to bottles, cans, or kegs. Quick packaging helps preserve the fresh hop aromas. Most IPAs taste best when consumed within 2-3 months of packaging.

    Ingredients for IPA

    A brewer carefully selects hops, measuring and adding them to a large pot. A chart on the wall shows different IPA bitterness levels

    Making great IPA requires four essential ingredients: water, malt, hops, and yeast. The quality and specific characteristics of each ingredient directly impacts the final beer’s flavor, aroma, and mouthfeel.

    Water Quality and Composition

    IPAs need clean, pure water with specific mineral content. Calcium levels between 50-150 ppm help create crisp, clean flavors. Sulfate levels of 150-300 ppm enhance hop bitterness and dryness.

    Water pH should stay between 5.2-5.6 during mashing for optimal enzyme activity and flavor development.

    Many successful IPA brewers start with reverse osmosis water and add brewing salts like gypsum and calcium chloride to achieve desired profiles.

    Malt Types and Uses

    Base malts make up 85-95% of the grain bill, with American 2-row and Pale Ale malt being common choices. These provide fermentable sugars while maintaining a clean flavor profile.

    East Coast IPAs often include caramel malts for body and sweetness, while West Coast styles keep the malt bill simpler.

    Crystal malts should be used sparingly – typically 2-5% maximum. Too much can overwhelm hop character and create unwanted sweetness.

    Yeast Strains and Fermentation Profiles

    American ale yeasts like US-05 and Wyeast 1056 produce clean fermentation profiles that let hop character shine. These strains attenuate well and leave minimal esters.

    Optimal fermentation temperatures range from 65-68°F (18-20°C). Higher temperatures can create unwanted fruity esters.

    The yeast should achieve 75-80% apparent attenuation to ensure the beer finishes dry enough to showcase hop character.

    Hop Selection for IPA

    Choosing the right hops plays a vital role in creating distinctive IPA flavors and aromas. The careful selection and combination of hop varieties directly impacts bitterness levels, flavor complexity, and aromatic qualities.

    Hop Varieties and Characteristics

    High-alpha varieties like Chinook, Simcoe, and Citra deliver strong bittering qualities to IPAs. These hops contain higher levels of alpha acids that create the characteristic IPA bitterness.

    Different hop varieties contribute unique flavor profiles. Amarillo adds citrus and orange notes, while Mosaic creates tropical fruit and berry characteristics.

    Quality matters significantly when selecting hops. Fresh, unopened hops with cohumulone levels below 30% provide cleaner bitterness and better flavor integration.

    Balancing Flavor and Aroma

    The key to a well-balanced IPA lies in combining complementary hop varieties. Pairing citrus-forward hops with tropical varieties creates complex flavor layers.

    Hop timing affects both flavor and aroma intensity. Late addition hops preserve delicate aromatic oils while reducing harsh bitterness.

    Water chemistry impacts hop expression. Proper pH levels during brewing enhance hop oil extraction and flavor development.

    Hop Scheduling and Usage Techniques

    Early kettle additions focus on bittering. Add high-alpha hops in the first 60 minutes of the boil for maximum bitterness extraction.

    Mid-boil additions at 30-15 minutes contribute flavor compounds. Late additions in the final 5 minutes or at flameout maximize aroma.

    Dry hopping adds intense hop aroma without increasing bitterness. Adding hops during fermentation helps integrate hop characteristics and smooth any harsh edges.

    The target beer style influences hop quantities. Classic American IPAs typically use 3-6 ounces of hops per 5-gallon batch, while Double IPAs may use twice that amount.

    Understanding IPA Bitterness Levels

    The bitter taste in IPAs comes from specific compounds in hops and varies based on hop varieties, brewing methods, and recipe formulation. Different IPA styles showcase distinct bitterness intensities that work with other flavor elements.

    Measuring Bitterness: IBU Explained

    International Bitterness Units (IBUs) measure the concentration of bitter compounds in beer. The scale ranges from 0-100+, with most IPAs falling between 40-70 IBUs.

    Different hop varieties contain varying amounts of alpha acids, which create bitterness. Chinook hops, for example, have 11-13% alpha acids, producing strong bitter notes.

    Not all IBUs taste the same. Dry-hopping can add perceived bitterness through different compounds than traditional boil additions.

    The Impact of Bitterness on IPA Styles

    American IPAs typically feature bold, assertive bitterness with IBUs ranging from 50-70. English IPAs tend toward more moderate bitterness levels of 40-60 IBUs.

    Modern hazy IPAs like Sierra Nevada’s Hazy Little Thing focus less on intense bitterness. These beers emphasize hop aromatics and fruity flavors instead.

    Double and Triple IPAs can push bitterness levels above 80 IBUs, though humans struggle to perceive differences beyond this point.

    Balancing Bitterness with Malt Sweetness

    Strong malt backbones help balance intense hop bitterness. Crystal malts add caramel sweetness that complements bitter flavors.

    The interaction between hops and malt creates a smoother bitterness profile when properly balanced. Too much bitterness without adequate malt support can taste harsh and lingering.

    Key factors for balance:

    • Malt bill composition
    • Final gravity (residual sweetness)
    • Hop timing during the brew
    • Water chemistry adjustments

    Different IPA Styles

    IPAs come in distinct variations with unique hop profiles and brewing techniques that create specific flavor signatures. Each style brings its own characteristic bitterness, aroma, and alcohol content.

    American IPA

    West Coast IPAs feature bold, assertive bitterness with strong pine and citrus notes. The appearance stays crystal clear, and the finish remains dry.

    American IPAs typically use American-grown hops like Cascade, Centennial, and Simcoe. These create flavors ranging from grapefruit to tropical fruit.

    Key Characteristics:

    • ABV: 6.3-7.5%
    • IBU: 50-70
    • Clear appearance
    • Medium body
    • Pronounced hop aroma

    English IPA

    English IPAs showcase a more balanced approach between malt and hops. Traditional English-style IPAs use hop varieties like Goldings, Fuggles, and Northdown.

    The flavor profile features earthy, floral notes with moderate bitterness. A robust malt backbone provides balance and subtle caramel undertones.

    Traditional Elements:

    • ABV: 5.0-7.0%
    • IBU: 40-60
    • Copper to amber color
    • Balanced malt presence
    • Herbal hop character

    Imperial / Double IPA

    Double IPAs amplify every aspect of the standard IPA. These beers pack intense hop flavor and higher alcohol content.

    The brewing process requires additional malt to balance the increased hop intensity. This creates a stronger, more complex beer.

    Notable Features:

    • ABV: 7.5-10%
    • IBU: 65-100
    • Full body
    • Intense hop aroma
    • Rich malt backbone

    The hop profile often combines multiple varieties for layers of flavor, from citrus to stone fruit to pine.

    Tasting and Evaluating IPA

    A brewery worker carefully selects hops, then brews and samples an IPA, evaluating its bitterness level

    Tasting panels play a crucial role in assessing the quality and characteristics of IPAs. Proper evaluation requires attention to specific attributes and an understanding of flavor interactions.

    Organoleptic Qualities

    The bitterness of an IPA is measured in International Bitterness Units (IBU), which quantifies the concentration of bittering compounds from hops.

    Professional tasters evaluate these key characteristics:

    • Aroma: Citrus, pine, tropical fruit, or floral notes
    • Appearance: Clarity, color, and head retention
    • Flavor: Balance between malt sweetness and hop bitterness
    • Mouthfeel: Body, carbonation, and texture

    Temperature affects taste perception. IPAs should be served between 45-50°F (7-10°C) to properly experience the hop aromatics and flavors.

    Pairing Food with IPA

    Spicy foods complement the hop-forward nature of IPAs, creating a balanced taste experience. The beer’s bitterness cuts through rich, fatty dishes.

    Strong food pairings include:

    • Sharp aged cheddar
    • Grilled meats
    • Spicy curry dishes
    • Mexican cuisine
    • Bold blue cheeses

    Light salads and delicate fish dishes may be overwhelmed by an IPA’s intense flavors. Match the beer’s intensity with equally robust foods.

    Innovation in IPA Brewing

    A brewer carefully selects hops, measuring and adding them to a large pot. The room is filled with the aroma of hops as the brewer works to create the perfect level of bitterness for their IPA

    Modern IPA brewing combines cutting-edge technology with creative techniques to push flavor boundaries. Brewers now use advanced hop products and precise timing methods to create unique taste profiles.

    Emerging Trends

    Water chemistry adjustments play a key role in modern IPA production. Brewers carefully control pH levels to maximize hop oil extraction and achieve optimal bitterness.

    Low-alcohol and session IPAs represent a growing market segment. These beers maintain intense hop character while reducing alcohol content through specialized brewing processes.

    New England-style IPAs have revolutionized the category with their hazy appearance and fruit-forward profiles. These beers use specific hop varieties and timing to create juicy flavors with reduced bitterness.

    Experimental Hops and Techniques

    Stone Brewing and other craft breweries now use advanced hop products like concentrated oils and custom blends to achieve consistent results.

    Hop addition timing has become more precise. Early additions create bitterness while late additions boost aroma and flavor intensity.

    Brewers experiment with unique hop combinations to create signature flavor profiles:

    • Dual dry-hopping stages
    • Hop stands at specific temperatures
    • Cryo hops for intense aromas
    • Bio-transformed hop products

    Frequently Asked Questions

    IPA brewing requires careful attention to hop selection, timing, and techniques to achieve desired bitterness levels. Different hop varieties and brewing methods create distinct flavor profiles ranging from 40-100 International Bitterness Units (IBU).

    What factors contribute to the bitterness level of an IPA?

    Hop timing during brewing plays a key role in bitterness levels. Early boil additions create more bitterness while late additions focus on aroma and flavor.

    The amount of hops used and their alpha acid content directly affects bitterness intensity. Higher alpha acid hops create more bitter notes.

    Water chemistry and malt selection also impact perceived bitterness. A balanced malt backbone helps support hop character without becoming harsh.

    How do I select the best hops for brewing an IPA?

    Choose hops based on their alpha acid content and aromatic qualities. Popular IPA varieties include Cascade, Centennial, and Citra.

    Consider the specific IPA style being brewed. New England IPAs use different hop varieties than West Coast IPAs to achieve their signature profiles.

    Match complementary hop flavors when using multiple varieties. Citrus notes pair well with tropical fruit characteristics.

    Can you explain the International Bitterness Units (IBU) scale used for IPAs?

    IBUs measure the concentration of isomerized alpha acids in beer. One IBU equals one part per million of isomerized alpha acid.

    American IPAs typically range from 40-70 IBUs. Double IPAs can exceed 100 IBUs.

    The human palate has difficulty distinguishing differences above 100 IBUs.

    What characteristics of hops are most important when brewing an IPA?

    Alpha acid content determines bittering potential. Beta acids contribute to preservation and subtle flavor components.

    Essential oils create distinctive aromas and flavors. Brewers layer multiple hop varieties to achieve complex profiles.

    Storage conditions affect hop quality. Fresh hops provide the best flavor and aroma.

    Which beer styles are known for having higher bitterness and hop content than IPAs?

    Double and Triple IPAs contain more hops and higher IBUs than standard IPAs. These beers often exceed 100 IBUs.

    Imperial IPAs feature intense hop character and alcohol content above 8% ABV.

    Barleywines can match or exceed IPA bitterness levels while adding strong malt presence.

    How do different hop varieties affect the flavor profile of an IPA?

    American hops like Cascade and Centennial create citrus and pine notes. Australian and New Zealand varieties add tropical fruit characteristics.

    European noble hops contribute spicy and floral elements. English varieties provide earthy and herbal qualities.

    Dry hopping techniques enhance aroma without increasing bitterness.

  • How to Brew the Perfect IPA: Master Homebrewer’s Tips for Crafting Award-Worthy Beer

    Making your own IPA at home can be a rewarding experience that lets you craft a unique, flavorful beer. Creating a great IPA requires careful attention to hop selection, proper temperature control during fermentation, and the right balance of malts to achieve the perfect blend of bitterness and aroma. Brewing a perfect IPA starts with understanding the basics of the brewing process.

    A brewer carefully measures hops and malt, then stirs them into a large pot of boiling water, creating the perfect IPA

    The key to crafting an excellent IPA lies in selecting high-quality ingredients and following proper brewing techniques. Dry hopping with the right hops adds intense aroma and flavor that defines this popular beer style. With proper equipment and attention to detail, anyone can make a delicious IPA at home.

    Key Takeaways

    • The quality and timing of hop additions determine the IPA’s signature flavor profile and aroma
    • Temperature control and proper fermentation create clean, crisp flavors without off-tastes
    • Sanitization and careful measurement of ingredients ensure consistent, high-quality results

    Understanding IPAs

    India Pale Ales set themselves apart with bold hop flavors, higher alcohol content, and rich aromas. The complex blend of ingredients and brewing techniques creates beers that range from crisp and citrusy to deep and piney.

    History of India Pale Ales

    British brewers created IPAs in the late 1700s to survive the long sea journey to India. They added extra hops and increased the alcohol content to preserve the beer during months of ocean travel.

    The style nearly disappeared in the early 1900s but experienced a revival in the 1970s when American craft brewers began experimenting with new hop varieties.

    Modern IPAs evolved significantly from their British roots, with American brewers pushing boundaries on hop intensity and flavor profiles.

    Characteristics of IPAs

    Key Features:

    • Higher alcohol content (6-7.5% ABV typical)
    • Pronounced hop bitterness (40-70 IBUs)
    • Strong hop aroma
    • Medium to full body
    • Clear to slightly hazy appearance

    The signature taste comes from careful hop additions during the brewing process. Late-addition hops create bright, fruity flavors while early additions provide balancing bitterness.

    Most IPAs use pale malt as their base, with small amounts of specialty malts adding complexity and color.

    Varieties of IPAs

    American IPA: Bold citrus and pine notes with a clean malt backbone.

    English IPA: More balanced with earthy hops and prominent malt character.

    West Coast IPA: Intensely hoppy, crisp, and dry with minimal malt presence.

    Modern variations include:

    • New England/Hazy IPA: Juicy, tropical flavors with low bitterness
    • Double/Imperial IPA: Stronger alcohol (8%+) and more intense hop character
    • Session IPA: Lower alcohol while maintaining hop prominence
    • Black IPA: Dark malts add roasted flavors

    Essential Brewing Supplies

    Making great IPA requires specific equipment, high-quality ingredients, and proper cleaning practices. Clean gear and fresh ingredients create the best results.

    Choosing Your Equipment

    A 5-gallon brewing kettle forms the foundation of any home brewing setup. The kettle needs a tight-fitting lid and should be stainless steel for durability.

    Basic brewing equipment includes a large mash tun, fermentation bucket, and bottle capper. A reliable thermometer helps monitor temperatures throughout the process.

    Essential tools include:

    • Long stirring spoon
    • Mesh straining bag
    • Hydrometer for measuring alcohol content
    • Airlock and stopper
    • Bottling bucket with spigot
    • Glass carboy for secondary fermentation

    Key Ingredients for IPAs

    High-quality base malt forms 80-90% of the grain bill. Pale malt or 2-row barley provides the foundation for most IPAs.

    Fresh hops are crucial for creating signature IPA flavors. Popular varieties include:

    • Cascade: Citrus and floral notes
    • Centennial: Strong pine character
    • Citra: Tropical fruit flavors
    • Simcoe: Earthy and piney

    Quality brewing yeast strains like US-05 or WLP001 help achieve clean fermentation profiles.

    Sanitation Essentials

    Proper sanitization prevents unwanted bacteria from spoiling the beer. Star San or iodophor solutions work well for sanitizing equipment.

    Required cleaning supplies:

    • Unscented cleanser
    • Bottle brush
    • Carboy brush
    • Sanitizing solution
    • Clean spray bottle
    • Soft cleaning cloths

    All equipment must be cleaned and sanitized before each use. Even small amounts of bacteria can ruin an entire batch.

    The Brewing Process

    Making great IPA requires careful attention to temperature, timing, and ingredient additions during four critical stages. The right process creates the perfect balance of hop bitterness, aroma, and malt backbone.

    Preparing the Mash

    Mashing combines malted grains with hot water at 150-155°F (65-68°C) for 60 minutes. This converts grain starches into fermentable sugars.

    The main malt bill typically includes:

    • 80-85% Pale malt base
    • 5-10% Crystal/caramel malt
    • 5-10% Wheat malt or oats

    Water chemistry plays a key role. Brewers should aim for:

    • pH between 5.2-5.6
    • Calcium: 50-150 ppm
    • Sulfate: 150-300 ppm for pronounced hop character

    Monitor temperature carefully during this phase. Too high or low can affect enzyme activity and final fermentability.

    Boiling and Hops Addition

    The boiling stage typically lasts 60-90 minutes. This sterilizes the wort and creates ideal conditions for hop utilization.

    Early hop additions contribute bitterness:

    • 60 minutes: High-alpha bittering hops
    • 30 minutes: Mid-boil additions for flavor
    • 5-0 minutes: Late additions for aroma

    A typical IPA hop schedule might use:

    • 1-1.5 oz bittering hops at 60 min
    • 1 oz aromatic hops at 15 min
    • 2-3 oz aromatic hops at flameout

    Keep the boil rolling but not too vigorous. This prevents scorching while ensuring proper hop isomerization.

    Fermentation

    Cool the wort to 65-68°F (18-20°C) before pitching yeast. American ale strains work best for classic IPA character.

    Common yeast choices include:

    • US-05 American Ale
    • WLP001 California Ale
    • London Ale III for hazy IPAs

    Maintain steady fermentation temperatures. Temperature spikes can create unwanted flavors.

    Primary fermentation typically takes 7-10 days. Watch for these signs of completion:

    • Stable gravity readings
    • Clear beer (unless brewing hazy IPA)
    • Dropped yeast cake

    Dry Hopping Techniques

    Dry hopping adds intense hop aroma without additional bitterness. Add hops when fermentation is nearly complete.

    Best practices include:

    • First dry hop addition at day 3-4 of fermentation
    • Second addition 2-3 days before packaging
    • Use 2-6 oz per 5 gallons depending on desired intensity

    Popular dry hop varieties:

    • Citra
    • Mosaic
    • Galaxy
    • Idaho 7

    Keep oxygen exposure minimal during dry hopping. Consider using a hop spider or mesh bag for easy removal.

    Conditioning and Aging

    A brewery scene with equipment and ingredients laid out for brewing IPA, including hops, malt, water, and brewing vessels

    After fermentation, proper conditioning and aging transforms your IPA from a raw brew into a polished, professional-quality beer. These final steps have a major impact on clarity, carbonation, and hop character.

    Cold Crashing

    Cold crashing drops the beer temperature to near freezing (32-38°F/0-3°C) for 24-48 hours before packaging. This process helps suspended yeast and proteins settle to the bottom, creating a clearer final product.

    The cold temperature causes particles to clump together and fall out of suspension faster. For best results, use a temperature-controlled fermenter or refrigerator.

    Make sure to monitor fermentation completion before cold crashing to avoid stuck fermentation.

    Carbonation Methods

    Force carbonation in kegs provides the most control and consistency. Set the CO2 pressure to 12-15 PSI at 38°F for 5-7 days.

    For bottle conditioning, add priming sugar at bottling time. Use 4-5 oz corn sugar per 5 gallons for moderate carbonation levels typical of American IPAs.

    Store bottles at room temperature (68-72°F) for 2-3 weeks to fully carbonate. Check one bottle first before refrigerating the full batch.

    Aging for Optimal Flavor

    IPAs are best consumed fresh to preserve hop aroma and flavor. Peak drinking window is typically 4-8 weeks after brewing.

    Store cold (35-40°F) in dark conditions. Light and heat accelerate hop degradation and can create off-flavors.

    Monitor the flavor development weekly. Most IPAs will show slight improvement in the first 2-3 weeks as flavors meld, then gradually decline after 2-3 months.

    Keep detailed notes on aging results to dial in the perfect drinking window for your specific IPA recipe.

    Packaging and Storage

    Proper packaging protects your IPA’s flavor and aroma while good storage conditions maintain beer quality for weeks or months. Temperature control and light protection are essential for preserving hop character.

    Bottling Your IPA

    Use clean, sanitized amber glass bottles to shield your IPA from light damage. A bottle filler attachment helps prevent oxidation during the transfer process.

    Mix priming sugar carefully with the beer to achieve proper carbonation – typically 2.2-2.5 volumes of CO2 for American IPAs.

    Fill bottles leaving 1-1.5 inches of headspace. Cap immediately using oxygen-absorbing caps to prevent oxidation.

    Let bottles condition at room temperature (68-72°F) for 2 weeks to develop carbonation.

    Kegging and Dispensing

    Clean and sanitize the keg thoroughly. Purge with CO2 before transferring beer to minimize oxygen exposure.

    Set CO2 pressure to 12-14 PSI for serving at 38°F. Allow 24-48 hours for proper carbonation.

    Use beverage lines 8-10 feet long with 3/16″ inner diameter to prevent foaming issues.

    Keep dispensing equipment clean and faucets sanitized between uses.

    Storage Recommendations

    Store bottles or kegs cold between 38-45°F to preserve hop flavors and aromas.

    Keep IPAs away from direct light. Even brief light exposure can cause “skunky” off-flavors.

    Most IPAs are best consumed within 3-4 months of packaging. Check for clarity and aroma changes regularly.

    Label containers with brewing and packaging dates to track freshness.

    Store upright to minimize contact between beer and cap/lid surfaces.

    Tasting and Evaluating Your IPA

    A glass of IPA being held up to the light, with bubbles rising to the surface and a frothy head on top. A notebook and pen sit nearby for evaluating the beer's aroma, flavor, and appearance

    A proper tasting starts with careful observation of specific traits in your IPA. This evaluation looks at three key elements that define beer quality.

    Analyzing Appearance

    Hold your IPA up to natural light or a white background. Look for a clear, bright golden to amber color, unless you’ve brewed a hazy IPA variant.

    A well-crafted IPA should maintain a stable, creamy head with good retention. The foam should leave lacing patterns on the glass as you drink.

    Check for any unwanted particles or cloudiness that might indicate fermentation issues. The beer should show good clarity unless intentionally hazy.

    Assessing Aroma

    Swirl the beer gently in the glass to release volatile compounds. Take several short sniffs rather than one long inhale.

    Notice the hop aromas first – they should be prominent with notes of:

    • Citrus (grapefruit, orange)
    • Pine
    • Tropical fruits
    • Floral elements

    Detect any malt sweetness beneath the hops. It should provide balance without overwhelming the hop character.

    Judging Flavor and Mouthfeel

    Take a sip and let it coat your entire palate. The initial taste should bring forward intense hop flavors matching the aroma profile.

    The bitterness should be pronounced but not harsh or astringent. A good IPA balances its hop intensity with malt character.

    The mouthfeel should be medium-bodied with moderate carbonation. Look for these qualities:

    • Clean fermentation profile
    • No off-flavors
    • Crisp finish
    • Pleasant lingering bitterness

    Temperature affects taste – serve between 45-50°F for optimal flavor expression.

    Tips and Tricks for Advanced Brewers

    Advanced IPA brewing requires precise control over water chemistry, expert hop selection, and careful yeast handling to create exceptional results. These techniques can dramatically improve flavor, aroma, and mouthfeel.

    Manipulating Water Profiles

    Water chemistry adjustments play a vital role in crafting the perfect IPA. The ideal sulfate-to-chloride ratio for IPAs ranges from 2:1 to 3:1.

    Adding gypsum increases sulfate levels, which enhances hop character and creates a crisper finish. Start with 150-200 ppm of sulfate.

    Calcium chloride additions help balance the beer’s profile and improve mouthfeel. Keep chloride levels between 50-75 ppm.

    Test pH levels during mashing. The optimal range is 5.2-5.4 pH. Use acidulated malt or lactic acid to adjust if needed.

    Experimenting with Hop Varieties

    Creating distinctive hop profiles requires strategic timing and variety selection. Use high-alpha hops early in the boil for bittering.

    Save aromatic varieties like Citra, Mosaic, and Galaxy for late additions and dry hopping. Add these hops at temperatures below 170°F to preserve volatile compounds.

    Try hop combinations in small batches before scaling up. Common pairings include:

    • Citra + Mosaic
    • Galaxy + Vic Secret
    • Nelson Sauvin + Motueka

    Yeast Management

    Proper yeast handling ensures consistent fermentation and flavor development. Make yeast starters 24-48 hours before brewing.

    Maintain strict temperature control during fermentation. Most IPA yeasts perform best between 66-68°F.

    Pitch rates matter. Use 1 million cells per milliliter per degree Plato for ales. Double this for high-gravity IPAs.

    Consider oxygen levels. Add pure O2 for 60-90 seconds before pitching yeast to reach 8-10 ppm dissolved oxygen.

    Responsible Brewing Practices

    Brewing IPA requires careful attention to both environmental impact and safety protocols to create great beer while protecting brewers and the planet.

    Environmental Considerations

    Using water efficiently during the brewing process helps reduce waste. Collect and reuse cleaning water when possible, and consider capturing rinse water for garden use.

    Spent grains make excellent compost or animal feed. Local farmers often welcome these nutrient-rich leftovers for livestock.

    Choose eco-friendly cleaning products that break down safely. Avoid harsh chemicals that can harm waterways or soil.

    Store ingredients properly to prevent spoilage and reduce waste. Keep hops frozen and grains in airtight containers away from moisture.

    Safety Procedures

    Clean and sanitize all equipment thoroughly before use. This includes fermenters, tubing, bottles, and any tools that contact the beer.

    Keep a fire extinguisher nearby when heating wort. Never leave boiling kettles unattended.

    Wear heat-resistant gloves when handling hot equipment. Use proper lifting techniques when moving heavy grain bags or full kettles.

    Store cleaning chemicals separately from brewing ingredients. Label all containers clearly to prevent dangerous mix-ups.

    Ensure proper ventilation when brewing indoors. Carbon dioxide from fermentation can build up in enclosed spaces.

    Frequently Asked Questions

    Brewing a perfect IPA requires specific equipment, ingredients, and careful attention to temperature and timing. Common challenges include hop selection, fermentation control, and maintaining proper sanitation.

    What equipment do I need to brew an IPA at home?

    A complete IPA brewing setup needs a large brewing kettle, fermenting vessel, airlock, thermometer, and sanitizing equipment.

    A bottling bucket, bottles, bottle caps, and a capper help with packaging the finished beer.

    Essential tools include a mash tun, wort chiller, and hydrometer for measuring sugar content.

    Can you outline the basic steps for brewing an IPA?

    The basic IPA brewing process starts with mashing malted grains in hot water to extract fermentable sugars.

    The liquid wort is boiled with hops for bitterness, flavor, and aroma.

    After cooling, yeast is added to start fermentation, which converts sugars into alcohol.

    How do different hop varieties affect the flavor of an IPA?

    American hops like Cascade and Centennial create citrus and pine flavors. English varieties produce earthy and floral notes.

    New World hops from Australia and New Zealand add tropical fruit characteristics.

    The timing of hop additions affects bitterness and aroma intensity.

    What is the ideal fermentation temperature for an IPA?

    Most IPA yeasts perform best between 65-70°F (18-21°C).

    Temperatures above 72°F (22°C) can create unwanted fruity flavors.

    Maintaining steady temperatures prevents stress on the yeast.

    How long does it typically take to brew and ferment an IPA?

    The brewing process takes 4-6 hours for a typical batch.

    Primary fermentation usually lasts 7-10 days.

    Dry hopping and conditioning need an additional 5-7 days before bottling.

    What are some common mistakes to avoid when brewing an IPA?

    Using old or improperly stored hops reduces flavor impact and aroma.

    Poor temperature control during fermentation can create off-flavors.

    Insufficient cleaning and sanitization can lead to infected batches.

  • The Science of Fermentation: How Yeast Transforms Sugar into Award-Winning Beer

    Beer making is a fascinating blend of art and science. Yeast plays a vital role in brewing, transforming simple sugars into the complex flavors we enjoy in our favorite brews.

    During fermentation, yeast cells convert cereal sugars into alcohol, carbon dioxide, and various flavor compounds that give beer its unique character.

    A glass jug of fermenting liquid bubbles as yeast particles swirl and interact, creating a frothy surface with a distinct aroma

    The magic happens when tiny microorganisms called Saccharomyces cerevisiae get to work.

    These hardworking yeast cells need nutrients like nitrogen, phosphorus, and vitamins to thrive and create the perfect brew.

    The process affects everything from alcohol content to taste, aroma, and texture.

    Beer’s texture and mouthfeel come from this careful dance between yeast and wort.

    The amount of alcohol and carbon dioxide produced shapes whether a beer feels light and crisp or full and smooth on the tongue.

    Key Takeaways

    • Yeast converts sugar into alcohol and carbon dioxide during fermentation
    • Temperature and nutrient levels control how yeast performs during brewing
    • Different yeast strains create unique flavors and styles of beer

    The Basics of Fermentation

    Fermentation transforms sugars into alcohol, acids, and gases through natural biochemical processes.

    The careful control of temperature, ingredients, and environmental conditions leads to successful fermentation outcomes.

    What Is Fermentation?

    Natural fermentation occurs when bacteria and yeast break down carbohydrates in foods and beverages. This process creates byproducts like lactic acid, alcohol, and acetic acid.

    The chemical reactions during fermentation change both the taste and preservation qualities of the ingredients.

    These changes give fermented products their distinctive flavors and aromas.

    Key Byproducts of Fermentation:

    • Alcohol (ethanol)
    • Lactic acid
    • Carbon dioxide
    • Acetic acid

    The Role of Yeast in Fermentation

    Yeast thrives best in warm environments between 75-85°F (24-29°C) with around 70% humidity.

    These microorganisms convert sugars into alcohol and carbon dioxide through their metabolic processes.

    The ingredients in the mixture directly affect fermentation rates.

    Sugar provides food for yeast growth, while salt can slow down the process.

    Essential Factors for Yeast Activity:

    • Proper temperature range
    • Adequate moisture
    • Available sugar
    • Controlled salt levels

    Yeast Types and Strains

    Different yeast varieties create distinct beer characteristics through their unique fermentation processes and flavor compounds.

    The choice of yeast determines both fermentation temperature requirements and final taste profiles.

    Ale Yeast vs. Lager Yeast

    Ale and lager yeasts work at different temperatures and produce distinct results.

    Ale yeasts thrive in warmer conditions between 60-70°F and float to the top during fermentation.

    Lager yeasts prefer cooler temperatures around 35-55°F and sink to the bottom. This creates a cleaner, crisper taste profile.

    The fermentation speed also differs significantly. Ale yeasts complete fermentation in 3-5 days, while lager yeasts take 1-2 weeks.

    The Impact of Yeast Strains on Flavor Profiles

    Yeast cells produce hundreds of flavor compounds during fermentation, creating unique taste and aroma profiles in every brew.

    Ale strains often create fruity and spicy notes. Common flavors include banana, clove, and apple.

    Lager strains generate fewer flavor compounds, resulting in clean and crisp beers. They allow malt and hop characteristics to shine through more clearly.

    The genetic stability of yeast strains affects their consistency in producing specific flavors batch after batch. Some strains maintain their characteristics better than others.

    The Fermentation Process

    Yeast fermentation transforms simple sugars into alcohol, carbon dioxide, and distinct flavor compounds.

    The process requires careful control of multiple variables to achieve optimal results.

    Aerobic vs. Anaerobic Fermentation

    Aerobic fermentation occurs when yeast has access to oxygen. During this phase, yeast cells multiply rapidly and build strong cell walls.

    Anaerobic fermentation begins when oxygen is depleted. This is when yeast produces alcohol and carbon dioxide as byproducts.

    The lack of oxygen triggers yeast to switch from reproduction to fermentation.

    This metabolic shift creates the desired alcoholic products and distinctive flavors in beer, wine, and other fermented beverages.

    The Stages of Yeast Fermentation

    The lag phase marks the start, where yeast cells adjust to their new environment. This typically lasts 12-24 hours.

    The exponential phase follows, with rapid yeast growth and active fermentation. This stage produces most of the alcohol and flavors.

    The stationary phase occurs when nutrients become limited. Fermentation slows as yeast activity decreases.

    The death phase happens when nutrients are depleted and alcohol levels rise too high for yeast survival.

    Controlling Fermentation Variables

    Temperature control is crucial, with optimal ranges between 75-85°F (24-29°C).

    Higher temperatures speed up fermentation but may create unwanted flavors.

    Key variables to monitor:

    • Sugar content
    • pH levels
    • Yeast strain selection
    • Nutrient availability

    Time requirements vary by product:

    • Beer: 1-2 weeks
    • Wine: Several months
    • Bread: 2-4 hours

    Proper sanitization prevents contamination that could spoil the fermentation process.

    Yeast Management

    Proper yeast handling makes the difference between great and mediocre beer. Yeast plays a vital role in creating the flavors, aromas, and alcohol content that define your brew.

    Yeast Nutrition and Health

    Yeast metabolism controls fermentation quality through the production of ethanol, esters, and other compounds.

    Healthy yeast needs proper nutrients to thrive.

    Essential nutrients for yeast health:

    • Zinc
    • Magnesium
    • Nitrogen
    • Amino acids
    • Vitamins

    Temperature control is critical.

    Most ale yeasts perform best between 65-72°F (18-22°C), while lager yeasts prefer 45-55°F (7-13°C).

    Pitching Rates and Oxygenation

    Oxygen availability affects yeast growth and fermentation.

    Proper oxygenation helps yeast cells build strong cell walls and reproduce effectively.

    Recommended pitching rates:

    • Ales: 0.75-1.0 million cells per milliliter per degree Plato
    • Lagers: 1.5-2.0 million cells per milliliter per degree Plato

    The Crabtree effect means yeast will ferment when glucose levels exceed 0.4%, even with oxygen present.

    Reusing Yeast

    Proper yeast harvesting and storage can save money and maintain consistency between batches.

    Yeast can typically be reused 4-6 times if handled correctly.

    Storage guidelines:

    • Keep at 33-38°F (1-3°C)
    • Use sanitized containers
    • Minimize oxygen exposure
    • Use within 2 weeks

    Test for viability before reuse. A cell count and vitality check helps ensure successful fermentation.

    Yeast’s Impact on Brew Quality

    Yeast transforms beer through complex biochemical processes that create distinct flavors, aromas, and textures.

    Different yeast strains affect fermentation speed and efficiency in unique ways.

    Flavor and Aroma Contributions

    The fermentation process directly influences mouthfeel and taste, with yeast creating specific flavor compounds during sugar metabolism.

    Each strain produces its own mix of esters, phenols, and other compounds.

    Some yeasts create fruity notes like banana or apple, while others generate spicy or peppery characteristics.

    Temperature control during fermentation affects these flavor compounds significantly.

    Ale yeasts typically work at warmer temperatures and produce more complex flavors. Lager yeasts ferment at cooler temperatures and tend to create cleaner, crisper taste profiles.

    Desirable vs. Undesirable Yeast By-products

    Good fermentation produces balanced alcohol levels and pleasant flavor compounds.

    Healthy yeast creates proper carbonation and maintains consistent clarity in the final product.

    Stressed or unhealthy yeast can generate off-flavors like:

    • Sulfur compounds (rotten egg smell)
    • Diacetyl (buttery taste)
    • Acetaldehyde (green apple flavor)

    Modern brewing techniques and genetic engineering help brewers select ideal yeast strains.

    These strains minimize unwanted compounds while maximizing desired characteristics.

    Proper temperature control and yeast health monitoring prevent most negative by-products.

    Measuring Fermentation Performance

    Tracking fermentation helps brewers ensure their yeast is working effectively and producing the desired results.

    Precise measurements reveal both the progress and quality of the fermentation process.

    Specific Gravity and Attenuation

    Original gravity readings typically start around 1.050 and drop to near 1.010 as fermentation progresses.

    These measurements track how much sugar the yeast converts to alcohol.

    A hydrometer or refractometer gives quick gravity readings. Take measurements at the same temperature for accuracy.

    Real degree of fermentation (RDF) shows how completely the yeast processed available sugars.

    Beer analyzers can measure RDF along with alcohol content and remaining sugars.

    Testing for Fermentation By-products

    Yeast vitality tests predict fermentation performance and final beer quality.

    Higher vitality scores indicate healthier yeast that will ferment more efficiently.

    pH changes early in fermentation give clues about yeast health. A rapid pH drop suggests active, healthy yeast cells.

    Dissolved oxygen levels between 5% and 50% of air saturation support optimal fermentation, varying by yeast strain.

    Regular DO monitoring helps maintain ideal conditions.

    Measuring diacetyl reduction rates reveals how well the yeast processes this unwanted compound that can create off-flavors.

    Troubleshooting Fermentation Issues

    When fermentation problems arise, quick identification and corrective action can save your brew.

    Problems with yeast health, temperature control, and sanitation create most common fermentation issues.

    Common Fermentation Problems

    No airlock activity might indicate a loose lid seal rather than stuck fermentation.

    Check the seal and ensure proper lid tightness.

    Stuck fermentation occurs when yeast stops working before reaching final gravity.

    To fix this, gently stir the fermenting beer to redistribute yeast.

    Key Prevention Tips:

    Identifying and Correcting Off-Flavors

    Sulfur or rotten egg smells suggest stressed yeast.

    Maintaining proper fermentation temperature helps prevent these off-flavors.

    Common Off-Flavors and Solutions:

    • Green apple taste: Let beer finish fermenting completely
    • Butterscotch notes: Check fermentation temperature and yeast health
    • Medicinal flavors: Improve sanitation practices

    Regular gravity readings help track fermentation progress and catch problems early.

    Most off-flavors can be prevented with proper yeast handling and temperature control.

    Advancements in Fermentation Technology

    A laboratory setup with various fermentation vessels, bubbling airlocks, and scientific equipment surrounded by shelves of yeast strains and brewing ingredients

    Modern yeast fermentation techniques have transformed since 2016, giving brewers more control over flavors and preservation.

    New monitoring systems track temperature, pH levels, and sugar content in real-time.

    Scientists have developed specialized yeast strains that produce specific flavor compounds.

    These engineered yeasts help create unique taste profiles while maintaining consistency across batches.

    Instant dry yeast technology delivers fast and reliable fermentation performance.

    This innovation helps brewers save time while achieving predictable results.

    Key Technology Improvements:

    • Automated fermentation control systems
    • Temperature-resistant yeast strains
    • Advanced nutrient monitoring
    • Precise oxygen regulation
    • Digital tracking software

    Green hydrogen technology is being researched to reduce the carbon footprint of fermentation processes.

    This development shows promise for creating more sustainable brewing practices.

    Smart sensors now measure alcohol content during fermentation without disrupting the process.

    These tools help brewers make adjustments in real-time to achieve desired outcomes.

    Computer modeling helps predict fermentation behavior before production begins.

    This allows brewers to optimize recipes and reduce waste through virtual testing.

    Sustainability in Brewing and Fermentation Practices

    Modern brewing practices aim to reduce environmental impact while maintaining quality.

    Craft breweries are shifting toward sustainability and targeting health-conscious consumers with lower-alcohol, lower-calorie options.

    The brewing process uses significant energy and water resources.

    Beer production involves blending malt, hops, and sugar with water before yeast fermentation, making resource efficiency crucial.

    Innovative brewers are creating circular systems to minimize waste.

    Using bakery leftovers instead of malt reduces costs and waste, while spent grain from brewing can be repurposed through additional fermentation.

    Key Sustainable Practices in Brewing:

    • Water conservation and recycling
    • Energy-efficient fermentation tanks
    • Waste reduction and byproduct reuse
    • Local ingredient sourcing
    • Renewable energy adoption

    Many breweries maintain their own yeast strains for specific beers.

    This practice helps reduce dependency on external resources and allows for more efficient fermentation processes while maintaining consistent product quality.

    Sustainable brewing methods often incorporate non-traditional yeasts and fermentation techniques.

    These approaches can unlock new flavors while reducing environmental impact and production costs.

    Frequently Asked Questions

    Common brewing questions focus on yeast’s role in transforming sugars into alcohol, carbon dioxide, and flavor compounds through fermentation.

    The specific yeast strain and fermentation conditions directly determine the final taste, aroma, and quality of the beer.

    What role does yeast play in the fermentation process of beer production?

    Yeast cells consume the sugars from malted grains and convert them into alcohol and carbon dioxide through alcoholic fermentation.

    This metabolic process creates various flavor compounds called esters and phenols.

    The yeast also helps filter and clarify the beer as cells clump together and settle at the bottom of the fermentation vessel.

    Which types of yeast are most commonly used in alcoholic fermentation and why?

    Ale and lager yeasts are the two main types used in brewing.

    Ale yeasts ferment at warmer temperatures (60-75°F) and create fruity flavors.

    Lager yeasts work best at cooler temperatures (35-55°F) and produce cleaner, crisper flavor profiles.

    How does the choice of yeast strain affect the flavor and aroma of the final brew?

    Different yeast strains produce unique combinations of flavor compounds during fermentation.

    Some create banana and clove notes, while others generate apple or pear aromas.

    The yeast strain influences the beer’s final sweetness, dryness, and body through its ability to consume different types of sugars.

    What are the key factors that influence yeast performance during fermentation?

    Temperature, sugar concentration, and oxygen levels significantly impact yeast health and fermentation efficiency.

    Proper nutrient availability and pH levels ensure optimal yeast growth and metabolism during fermentation.

    Can you explain the scientific principles behind yeast-driven fermentation?

    Yeast cells use enzymes to break down glucose molecules through glycolysis.

    This process generates pyruvate, which gets converted to ethanol and carbon dioxide.

    ATP production during fermentation provides energy for yeast cells to continue their metabolic activities.

    What are the differences between lactic acid fermentation and yeast fermentation in the context of brewing?

    Lactic acid fermentation, performed by bacteria, produces sour flavors through the creation of lactic acid. This process occurs in specific beer styles like Berliner Weisse and Gose.

    Yeast fermentation primarily produces ethanol and carbon dioxide, creating the basic alcohol content and carbonation in most beers.

  • The Science of Fermentation: How Yeast Transforms Sugar into Award-Winning Beer

    . .

    .

    A glass jug of fermenting liquid bubbles as yeast particles swirl and interact, creating a frothy surface with a distinct aroma

    .

    These hardworking yeast cells need nutrients like nitrogen, phosphorus, and vitamins to thrive and create the perfect brew.

    .

    Beer’s texture and mouthfeel come from this careful dance between yeast and wort.

    .

    Key Takeaways

    • Yeast converts sugar into alcohol and carbon dioxide during fermentation
    • Temperature and nutrient levels control how yeast performs during brewing
    • Different yeast strains create unique flavors and styles of beer

    The Basics of Fermentation

    Fermentation transforms sugars into alcohol, acids, and gases through natural biochemical processes.

    .

    What Is Fermentation?

    Natural fermentation occurs when bacteria and yeast break down carbohydrates in foods and beverages. .

    .

    .

    Key Byproducts of Fermentation:

    • Alcohol (ethanol)
    • Lactic acid
    • Carbon dioxide
    • Acetic acid

    The Role of Yeast in Fermentation

    Yeast thrives best in warm environments between 75-85°F (24-29°C) with around 70% humidity.

    .

    .

    .

    Essential Factors for Yeast Activity:

    • Proper temperature range
    • Adequate moisture
    • Available sugar
    • Controlled salt levels

    Yeast Types and Strains

    Different yeast varieties create distinct beer characteristics through their unique fermentation processes and flavor compounds.

    .

    Ale Yeast vs. Lager Yeast

    Ale and lager yeasts work at different temperatures and produce distinct results.

    .

    . .

    . .

    The Impact of Yeast Strains on Flavor Profiles

    Yeast cells produce hundreds of flavor compounds during fermentation, creating unique taste and aroma profiles in every brew.

    . .

    . .

    The genetic stability of yeast strains affects their consistency in producing specific flavors batch after batch. .

    The Fermentation Process

    Yeast fermentation transforms simple sugars into alcohol, carbon dioxide, and distinct flavor compounds.

    .

    Aerobic vs. Anaerobic Fermentation

    Aerobic fermentation occurs when yeast has access to oxygen. .

    . .

    .

    .

    The Stages of Yeast Fermentation

    The lag phase marks the start, where yeast cells adjust to their new environment. .

    The exponential phase follows, with rapid yeast growth and active fermentation. .

    . .

    .

    Controlling Fermentation Variables

    Temperature control is crucial, with optimal ranges between 75-85°F (24-29°C).

    .

    Key variables to monitor:

    • Sugar content
    • pH levels
    • Yeast strain selection
    • Nutrient availability

    Time requirements vary by product:

    • Beer: 1-2 weeks
    • Wine: Several months
    • Bread: 2-4 hours

    Proper sanitization prevents contamination that could spoil the fermentation process.

    Yeast Management

    Proper yeast handling makes the difference between great and mediocre beer. Yeast plays a vital role in creating the flavors, aromas, and alcohol content that define your brew.

    Yeast Nutrition and Health

    Yeast metabolism controls fermentation quality through the production of ethanol, esters, and other compounds.

    .

    Essential nutrients for yeast health:

    • Zinc
    • Magnesium
    • Nitrogen
    • Amino acids
    • Vitamins

    Temperature control is critical.

    .

    Pitching Rates and Oxygenation

    Oxygen availability affects yeast growth and fermentation.

    .

    Recommended pitching rates:

    • Ales: 0.75-1.0 million cells per milliliter per degree Plato
    • Lagers: 1.5-2.0 million cells per milliliter per degree Plato

    The Crabtree effect means yeast will ferment when glucose levels exceed 0.4%, even with oxygen present.

    Reusing Yeast

    Proper yeast harvesting and storage can save money and maintain consistency between batches.

    .

    Storage guidelines:

    • Keep at 33-38°F (1-3°C)
    • Use sanitized containers
    • Minimize oxygen exposure
    • Use within 2 weeks

    Test for viability before reuse. .

    Yeast’s Impact on Brew Quality

    Yeast transforms beer through complex biochemical processes that create distinct flavors, aromas, and textures.

    Different yeast strains affect fermentation speed and efficiency in unique ways.

    Flavor and Aroma Contributions

    The fermentation process directly influences mouthfeel and taste, with yeast creating specific flavor compounds during sugar metabolism.

    .

    .

    .

    . .

    Desirable vs. Undesirable Yeast By-products

    Good fermentation produces balanced alcohol levels and pleasant flavor compounds.

    .

    Stressed or unhealthy yeast can generate off-flavors like:

    • Sulfur compounds (rotten egg smell)
    • Diacetyl (buttery taste)
    • Acetaldehyde (green apple flavor)

    Modern brewing techniques and genetic engineering help brewers select ideal yeast strains.

    .

    .

    Measuring Fermentation Performance

    Tracking fermentation helps brewers ensure their yeast is working effectively and producing the desired results.

    .

    Specific Gravity and Attenuation

    Original gravity readings typically start around 1.050 and drop to near 1.010 as fermentation progresses.

    .

    . .

    .

    Beer analyzers can measure RDF along with alcohol content and remaining sugars.

    Testing for Fermentation By-products

    Yeast vitality tests predict fermentation performance and final beer quality.

    .

    . .

    Dissolved oxygen levels between 5% and 50% of air saturation support optimal fermentation, varying by yeast strain.

    .

    .

    Troubleshooting Fermentation Issues

    When fermentation problems arise, quick identification and corrective action can save your brew.

    .

    Common Fermentation Problems

    No airlock activity might indicate a loose lid seal rather than stuck fermentation.

    .

    Stuck fermentation occurs when yeast stops working before reaching final gravity.

    .

    Key Prevention Tips:

    Identifying and Correcting Off-Flavors

    Sulfur or rotten egg smells suggest stressed yeast.

    .

    Common Off-Flavors and Solutions:

    • Green apple taste: Let beer finish fermenting completely
    • Butterscotch notes: Check fermentation temperature and yeast health
    • Medicinal flavors: Improve sanitation practices

    Regular gravity readings help track fermentation progress and catch problems early.

    .

    Advancements in Fermentation Technology

    A laboratory setup with various fermentation vessels, bubbling airlocks, and scientific equipment surrounded by shelves of yeast strains and brewing ingredients

    Modern yeast fermentation techniques have transformed since 2016, giving brewers more control over flavors and preservation.

    .

    .

    .

    Instant dry yeast technology delivers fast and reliable fermentation performance.

    .

    Key Technology Improvements:

    • Automated fermentation control systems
    • Temperature-resistant yeast strains
    • Advanced nutrient monitoring
    • Precise oxygen regulation
    • Digital tracking software

    Green hydrogen technology is being researched to reduce the carbon footprint of fermentation processes.

    .

    .

    .

    .

    .

    Sustainability in Brewing and Fermentation Practices

    Modern brewing practices aim to reduce environmental impact while maintaining quality.

    Craft breweries are shifting toward sustainability and targeting health-conscious consumers with lower-alcohol, lower-calorie options.

    .

    Beer production involves blending malt, hops, and sugar with water before yeast fermentation, making resource efficiency crucial.

    .

    Using bakery leftovers instead of malt reduces costs and waste, while spent grain from brewing can be repurposed through additional fermentation.

    Key Sustainable Practices in Brewing:

    • Water conservation and recycling
    • Energy-efficient fermentation tanks
    • Waste reduction and byproduct reuse
    • Local ingredient sourcing
    • Renewable energy adoption

    Many breweries maintain their own yeast strains for specific beers.

    .

    .

    .

    Frequently Asked Questions

    Common brewing questions focus on yeast’s role in transforming sugars into alcohol, carbon dioxide, and flavor compounds through fermentation.

    .

    ?

    Yeast cells consume the sugars from malted grains and convert them into alcohol and carbon dioxide through alcoholic fermentation. Ale and lager yeasts are the two main types used in brewing. .

    .

    .

    ?

    Temperature, sugar concentration, and oxygen levels significantly impact yeast health and fermentation efficiency.

    .

    ?

    .

    .

    .

    ?

    . This process occurs in specific beer styles like Berliner Weisse and Gose.